How Wall Chargers Are Installed: A Beginner-Friendly Guide: A Beginner-Friendly Guide
Wall chargers are installed by plugging them into a compatible wall outlet. Some advanced charging stations and built-in USB wall outlets require electrical installation, while standard wall chargers simply plug into an existing outlet and are ready to use.
Most wall chargers require no special installation. Simply plug the charger into a wall outlet and connect your device using a compatible cable. Built-in USB wall outlets require replacement of an existing outlet and should follow electrical safety guidelines.
I’m Ethan Walker, and I regularly test smartphones, chargers, USB-C cables, power banks, laptops, batteries, gaming accessories, and smart home gadgets. In my experience, standard wall chargers are among the easiest tech accessories to use because installation usually takes only a few seconds.
Introduction
Wall chargers help power nearly every modern device.
From smartphones and tablets to laptops and earbuds, charging starts with a reliable power source.
Most wall chargers do not require tools or technical skills. However, built-in charging outlets follow a different installation process.
Types of Wall Charger Installations
Not all wall chargers are installed the same way.
| Charger Type | Installation Method |
|---|---|
| Standard Wall Charger | Plug into outlet |
| USB-C Charger | Plug into outlet |
| Multi-Port Charger | Plug into outlet |
| Built-In USB Outlet | Electrical installation |
| Charging Station | Outlet or wall mounting |
Most chargers sold today are plug-and-play devices that work immediately after being connected to a wall outlet.
How Standard Wall Chargers Are Installed
The installation process is very simple.
Choose a working wall outlet near your device.
Plug the charger firmly into the outlet.
Attach a compatible charging cable.
Plug the cable into the device and confirm charging starts.
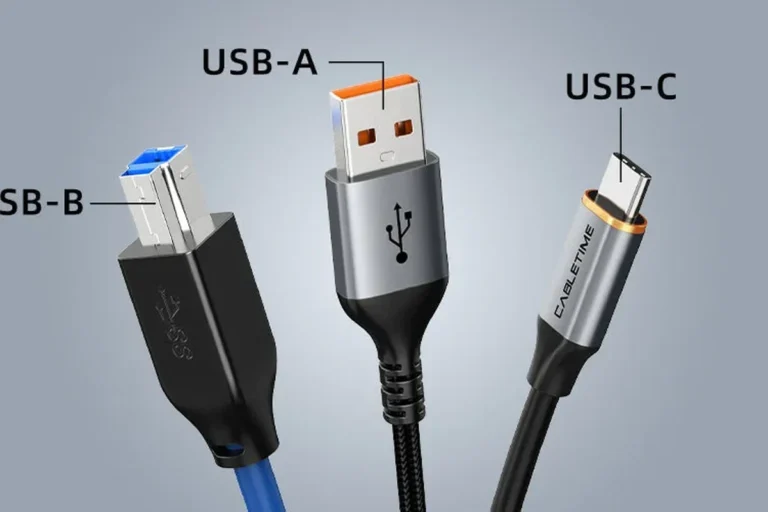
Use the original cable or a certified replacement cable for the best charging performance.
Built-In USB Wall Outlet Installation
Some homes use wall outlets that include built-in USB ports.
These outlets replace standard electrical outlets and require wiring.
If you are not experienced with household electrical work, contact a qualified electrician before installing a built-in USB outlet.
Built-in USB outlets provide convenient charging without needing a separate wall charger.
Installation Comparison
| Feature | Plug-In Charger | Built-In USB Outlet |
|---|---|---|
| Easy Setup | Yes | No |
| Requires Tools | No | Yes |
| Requires Wiring | No | Yes |
| Portable | Yes | No |
| Beginner Friendly | Yes | Limited |
Compatibility Considerations
Always verify that your charger provides enough power for the device you want to charge.
When testing chargers, I always check both wattage and charging protocol support. A charger may fit physically but still deliver slower charging if it lacks the proper specifications.
Checklist Before Installation
- Inspect the outlet for damage
- Verify charger compatibility
- Check the cable condition
- Confirm correct voltage requirements
- Allow adequate airflow around the charger
Pros and Cons of Plug-In Wall Chargers
- Easy installation
- Portable design
- No tools required
- Works in most locations
- Simple replacement process
- Occupies outlet space
- Can be misplaced
- Some models have limited ports
- May block nearby outlets
Troubleshooting Installation Problems
| Problem | Possible Solution |
|---|---|
| Device not charging | Check cable connection |
| Loose charger | Inspect outlet condition |
| Slow charging | Verify charger output |
| Intermittent charging | Replace damaged cable |
| Overheating | Improve ventilation |
Safety Tips
Most charging problems are caused by worn cables, damaged outlets, or low-quality accessories.
| Safety Practice | Benefit |
|---|---|
| Use certified chargers | Improves safety |
| Inspect cables regularly | Reduces failures |
| Keep chargers dry | Prevents electrical issues |
| Avoid damaged outlets | Improves reliability |
| Replace damaged accessories | Protects devices |
Helpful resources include Apple Support, USB-IF, Battery University, FTC, and ENERGY STAR.
Frequently Asked Questions
Most wall chargers are installed by plugging them into a wall outlet and connecting a charging cable.
No. Standard wall chargers do not require professional installation.
If you have electrical experience you may be able to, but many homeowners choose a licensed electrician.
Check the outlet, charging cable, charger connection, and device compatibility.
No. USB-C wall chargers are typically installed the same way as other plug-in chargers.
Most modern chargers are designed to remain plugged in, but they should be inspected regularly for damage.
Wall chargers need minimal maintenance, but cables and connectors should be checked for wear.
Related Guides
- Which wall charger is best
- Are wall chargers safe
- Do wall chargers work with all devices
- Can wall chargers be used for iPhones
- How many watts should a charger have
Conclusion
So, how are wall chargers installed? In most cases, installation is as simple as plugging the charger into a wall outlet and connecting your device.
Built-in USB outlets require additional electrical work, but standard wall chargers are easy for beginners to use.
Always follow basic safety practices, inspect accessories regularly, and use compatible chargers and cables for the best results.
- Most wall chargers plug directly into outlets
- No tools are needed for standard chargers
- Built-in USB outlets require wiring
- Compatibility matters
- Safety checks are important
Most wall charger installations take only a few seconds. Use quality chargers, check compatibility, and follow safety guidelines for reliable charging every day.