Camper Vent Fan Replacement Guide for Easy Upgrades
Choose a camper vent fan replacement by matching the roof opening, 12V wiring, and vent clearance first. For best results, favor a full assembly when the old unit is cracked or worn, and follow the manual for sealing and testing.
If your camper roof fan is noisy, weak, cracked, or no longer reliable, a camper vent fan replacement is often the simplest way to restore airflow and reduce heat buildup. The key is matching the new fan to your roof vent opening, power setup, and control style before you buy.
- Fit first: Measure rough opening, trim size, and roof thickness before comparing models.
- Power matters: Confirm 12V compatibility, polarity, and expected amp draw.
- Choose the right scope: Full assembly for damaged vents; motor-only only when the rest is sound.
- Seal carefully: Correct sealant and clean mounting surfaces help prevent leaks.
- Maintain it: Regular cleaning and inspection reduce noise, wear, and water problems.
Camper Vent Fan Replacement: What You Need to Know Before You Start
A replacement makes sense when the fan housing is damaged, the motor is failing, or repair parts are hard to source. In many RVs and campers, a full replacement is also the cleaner choice if the old unit has repeated wiring issues, stripped mounts, or a brittle vent cover that will not seal well anymore.
When a replacement makes more sense than a repair
Repair can be worth it for a loose wire, a worn switch, or a simple fuse issue. But if the fan blade is cracked, the motor hums without moving much air, or the plastic frame has warped from sun and heat, replacement usually offers a better long-term fix.
It also helps to compare the age and condition of the whole vent assembly, not just the fan. If the gasket, trim ring, or roof seal is failing, replacing only one part may leave you with another weak point later.
Main answer: how to choose the right replacement fan fast
Start with fit, then move to airflow and power. The most important checks are rough opening size, roof thickness, 12V compatibility, and whether you want a manual, thermostat-controlled, or reversible fan.
For a quick shortlist, read the manufacturer’s manual, confirm the vent dimensions, and verify the control type before ordering. If you are upgrading from an older unit, it can also help to compare the replacement against a broader battery or power maintenance topic like this battery replacement guide to think about lifespan, serviceability, and long-term ownership costs in a more practical way.
How Camper Vent Fans Work and Why They Fail Over Time
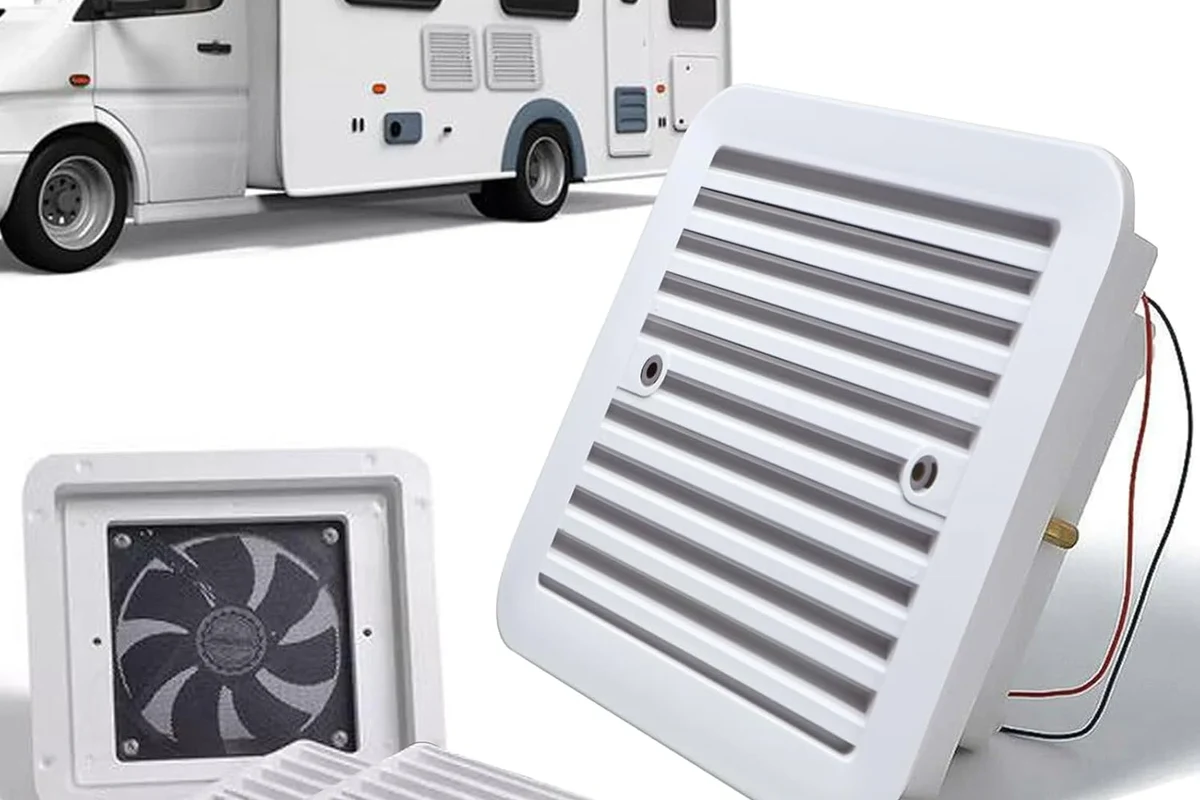
Most camper vent fans pull air out of the interior or push fresh air in through a roof opening. They run on 12V DC in many RVs, and their performance depends on blade design, motor quality, roof vent shape, and how well the cover allows air to move.
Basic airflow, power draw, and vent opening design
The fan motor spins the blades to create pressure differences that move air through the roof vent. A better design usually moves air more efficiently, but real-world performance still depends on how much resistance the vent cover and screen create.
Power draw matters because many campers rely on house batteries. A fan that uses less current can run longer, which is useful for boondocking, overnight sleeping, or hot-weather ventilation when shore power is not available.
Common failure points: motor wear, cracked housings, noisy blades, and wiring issues
Fan motors can wear out from age, dust, heat, and vibration. Plastic housings may crack in strong sun, and blades can become noisy if they are bent, unbalanced, or rubbing against the frame.
Wiring problems are also common, especially where the fan connects to a switch, thermostat, or wall control. Loose terminals, corroded connections, and reversed polarity can cause weak performance or no operation at all.
Fit and Sizing Guide: Matching the New Fan to Your RV or Camper Roof Vent
Fit is the first thing to verify because many replacement headaches come from opening size or trim mismatch, not from fan performance. Even when two products look similar, small differences in the frame or roof thickness range can affect installation.
Measuring rough opening size, trim dimensions, and roof thickness
Measure the rough opening from inside the camper, then compare that measurement to the replacement fan’s stated compatibility range. Also check the trim ring or interior bezel size, since a fan may fit the opening but still leave gaps around the inside finish.
Roof thickness matters because the mounting hardware and shroud depth need enough range to clamp securely. If your roof build-up includes insulation, liners, or aftermarket panels, that extra thickness can change what will fit.
- Check rough opening size, trim dimensions, and roof thickness
- Confirm 12V compatibility, control style, and vent cover clearance
- Review the manual, warranty terms, and installation hardware list
12V compatibility, blade diameter, and vent cover clearance
Most camper vent fans are designed for 12V DC systems, but you should still verify the exact voltage and connector style in the product manual. If the fan is part of a larger roof vent assembly, make sure the blade diameter and housing depth will not interfere with the cover when it closes.
Clearance is especially important on low-profile roofs and older vents. A fan that sits too high can hit the lid, reduce airflow, or create extra noise from contact and vibration.
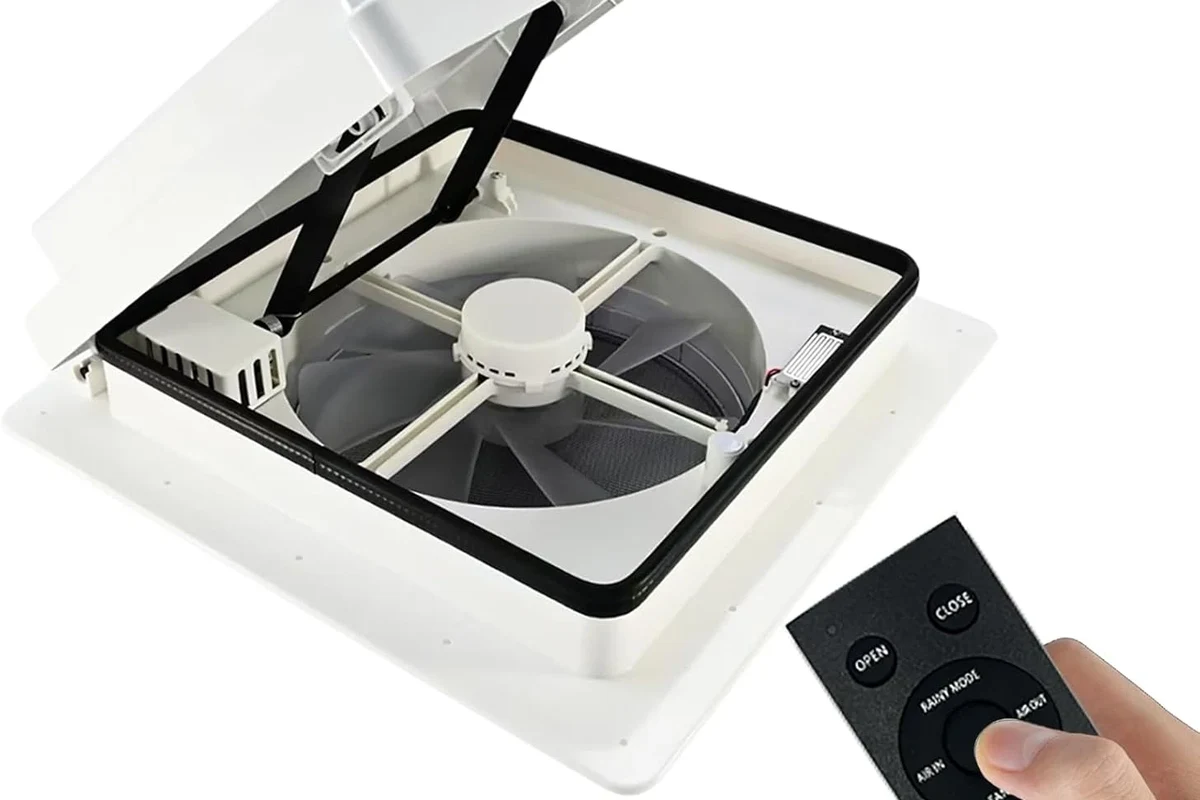
Manual, thermostat, and reversible airflow options
Manual fans are simple and often easier to troubleshoot. Thermostat-controlled models can help maintain a more stable cabin temperature, while reversible fans let you choose between exhaust and intake modes depending on weather and cooking odors.
Choose the control style that matches how you camp. If you often travel in changing weather, reversible airflow can be more useful than a single-speed design, but it may also add wiring or setup complexity.
Key Specifications to Compare Before Buying a Replacement
Once fit is confirmed, compare the specs that affect comfort, battery use, and durability. The best replacement is not always the strongest one; it is the one that balances airflow, efficiency, noise, and build quality for your camping style.
Airflow rating, noise level, amp draw, and power efficiency
Airflow ratings help you compare models, but they are only one part of the picture. A fan that moves a lot of air may also be louder or draw more current, which matters if you sleep near it or rely on battery power.
Noise level is often subjective and can vary with blade shape, mounting stiffness, and roof resonance. If a product listing does not clearly explain how the fan is controlled or what speed settings are included, confirm those details before buying.
Material quality, weather resistance, and motor durability
Camper roof gear lives in a harsh environment, so material quality matters. UV exposure, rain, dust, and vibration can shorten the life of cheap plastic parts, especially if the fan cover or frame is thin.
Look for weather-resistant construction and a motor design intended for continuous ventilation use. If a listing or manual does not clearly state outdoor exposure limits, treat that as a sign to inspect the warranty and installation notes closely.
Controls, speed settings, and remote or wall-switch convenience
Simple wall switches are easy to live with and usually easy to service. More advanced fans may offer multiple speeds, thermostats, remotes, or integrated controls, but those features only help if they are reliable and compatible with your camper’s wiring.
Convenience features can be useful for sleeping, cooking, or pet comfort, yet they should not outweigh fit and durability. A well-mounted basic fan often outlasts a feature-heavy model that is difficult to repair.
Replacement Options: Full Fan Assembly vs Motor-Only vs Upgrade Kit
There are three common paths for camper vent fan replacement: a full assembly, a motor-only swap, or an upgrade kit. Which one makes sense depends on the condition of the housing, wiring, and vent frame.
- Full assemblies reduce compatibility guesswork
- Motor-only swaps can be more affordable when the housing is still solid
- Upgrade kits may improve airflow or control options
- Full assemblies can take more labor if the roof seal must be redone
- Motor-only swaps may not solve cracked plastic or worn mounts
- Upgrade kits can add complexity if the original vent is older
When a full assembly is the safest and easiest choice
If the old fan has a cracked frame, damaged cover, or multiple worn parts, a full assembly is often the cleanest route. It reduces the chance of mixing old and new components that do not align well.
This option is also smart when the original unit is discontinued or when you want to refresh the whole vent system at once. It can simplify the repair because you are replacing the main wear points together.
When a motor-only swap can save money
A motor-only replacement can make sense when the housing, cover, and vent frame are still in good condition. If the problem is limited to a failed motor or worn blade, this approach can keep costs and labor lower.
That said, motor-only swaps are best for readers who are comfortable confirming part numbers and connector compatibility. If the internal parts are hard to source or the old fan has multiple issues, the savings may not be worth the risk.
Trade-offs in cost, installation time, and long-term reliability
Full assemblies usually cost more upfront but may offer better long-term peace of mind. Motor-only swaps can be faster on paper, yet they may leave you with older parts that fail later and require another repair.
For many owners, the decision comes down to how long they plan to keep the camper and how much time they want to spend on future maintenance. If you want fewer surprises, replacing more of the worn system at once is often the more dependable approach.
Step-by-Step Camper Vent Fan Replacement Setup Guide
Before starting, read the official instructions for your specific fan and roof vent. Installation details vary by model, and the correct sealant, screw pattern, and wiring method should come from the manufacturer, not guesswork.
Tools, sealants, wiring basics, and prep before removal
Gather the tools listed in the manual, plus any approved sealant or replacement gasket. Turn off power to the fan circuit before you open the housing, and make sure the roof area is dry and stable enough to work safely.
It also helps to label wires before disconnecting them. That simple step can prevent confusion when reconnecting the new fan, especially if the original wiring colors are faded or inconsistent.
Shut off power before touching wiring, and stop if you find burned connectors, melted insulation, or water damage around the vent. If the roof opening shows rot, structural damage, or active leaks, follow the manufacturer’s guidance and consider professional help.
Safe removal of the old fan and inspection of the vent frame
Remove the interior trim and carefully disconnect the wiring according to the manual. As the old unit comes out, inspect the vent frame for cracks, corrosion, soft spots, or signs of water intrusion.
If the frame is damaged, a new fan alone may not solve the problem. You want a stable mounting surface before installing the replacement, or the fan may vibrate, leak, or loosen over time.
Installing the new fan, sealing the roof opening, and testing operation
Place the new fan according to the supplied orientation and fastener pattern. Use only the sealant or gasket type approved by the manufacturer, because the wrong product can fail early or make future removal difficult.
After mounting, reconnect the wiring with the correct polarity and test every speed or control mode before closing the trim. Then confirm that the lid opens and closes freely, the fan runs smoothly, and the interior finish sits flush without gaps.
Cut power at the source, then remove the interior cover and expose the wiring and mounting points.
Check for cracks, corrosion, mold, soft wood, or old sealant that needs to be replaced before the new fan goes in.
Install the new fan using the correct hardware, then seal the roof opening exactly as the manual directs.
Restore power, verify polarity, and run the fan through its modes to confirm smooth operation and proper clearance.
Safety, Maintenance, and Common Mistakes to Avoid
Good installation is only part of the job. A camper vent fan will last longer and leak less if you inspect it regularly, keep it clean, and avoid the most common setup errors.
Power shutoff, wire inspection, and leak prevention
Always shut off the circuit before touching the fan wiring. If the wiring insulation is brittle or the connectors look overheated, replace the damaged parts only with compatible components and follow the manufacturer’s instructions.
Leak prevention starts with a clean sealing surface and the right sealant. Old caulk, dirt, and uneven mounting pressure can create tiny gaps that let water in during rain or washing.
Typical installation errors: poor sealing, wrong polarity, and loose mounts
Poor sealing is one of the most common mistakes because it may not show up immediately. Another frequent issue is reversed polarity, which can keep a DC fan from running correctly or damage some control setups.
Loose mounts can cause rattling, airflow loss, and premature wear. If the fan shifts while running, recheck the hardware and mounting surface rather than tightening blindly.
Cleaning, lubrication, storage, and seasonal inspection tips
Dust and debris can reduce airflow and add noise, so clean the cover and screen on a regular schedule. Follow the manual for any lubrication guidance, because not every motor or bearing system is meant to be oiled.
Before seasonal storage or long trips, inspect the fan for cracks, loose fasteners, and sealant wear. If you camp in hot sun or heavy rain, make roof vent checks part of your normal maintenance routine.
Value, Limitations, and Final Recommendation for 2026 Buyers
The best camper vent fan replacement is usually the one that fits correctly, runs efficiently, and is easy to maintain. For most buyers, that means prioritizing match, reliability, and sealing quality over flashy features.
Who benefits most from a replacement upgrade
Owners with noisy, weak, or broken roof fans benefit the most, especially if they camp in warm weather or sleep in the vehicle often. A replacement can also help travelers who need better airflow for cooking odors, pet comfort, or moisture control.
If your camper already has a solid roof opening and dependable wiring, a new fan can be one of the more practical upgrades you make. It improves comfort without adding much complexity compared with larger electrical projects.
Limits to expect in hot weather, heavy rain, and high-noise models
Even a better fan will not fully overcome extreme heat if the camper lacks insulation or shade. In heavy rain, you still need to follow the vent’s operating limits and close it when required by the manual.
Noise can also remain an issue with some high-airflow designs. If quiet operation matters most, compare speed control, mounting stability, and blade design rather than focusing on airflow alone.
Transparent verdict: best approach for budget, performance, and longevity
For most readers, the best approach is to buy a replacement that matches the vent opening exactly, uses the correct 12V setup, and offers the simplest control system that fits your needs. Choose a full assembly when the old unit is cracked, worn, or leak-prone; choose a motor-only swap only when the housing and wiring are still in good shape.
The most reliable long-term result usually comes from careful measurement, proper sealing, and routine inspection. If you confirm the fit before purchase and follow the official installation instructions, camper vent fan replacement can be a straightforward upgrade with real comfort benefits.
- Measure the rough opening, roof thickness, and trim dimensions before buying.
- Match 12V power, control style, and vent clearance to your camper’s setup.
- Use a full assembly for cracked or worn vents; use motor-only replacement only when the rest of the unit is sound.
- Seal carefully, test all modes, and inspect the fan seasonally to reduce leaks and noise.
Frequently Asked Questions
If the fan is noisy, weak, cracked, or no longer runs reliably, replacement is often the better option. It is also a smart choice when the housing, cover, or wiring has multiple wear points.
Measure the rough opening, trim dimensions, and roof thickness before buying. Always compare those numbers with the manufacturer’s compatibility range, since fit can vary by model.
Choose a full assembly if the frame, cover, or mounts are cracked or worn. A motor-only swap can save money when the housing and wiring are still in good condition.
Focus on airflow, amp draw, noise, material quality, and weather resistance. Controls, speed settings, and clearance under the vent cover also matter for real-world use.
Turn off power, follow the manual, inspect the vent frame, and use the approved sealant or gasket. Test polarity, fan operation, and lid clearance before finishing the trim.
Clean the cover and screen regularly, inspect the sealant and fasteners seasonally, and follow the manual for lubrication guidance. Stop using the fan if you see overheating, damaged wiring, or water intrusion.