Camper AC Fan Not Working Fixes You Need to Try Now
Check power, thermostat settings, airflow blockages, and visible wiring first if your camper AC fan is not working. If the fan hums or starts weakly, the capacitor or motor is often the next place to look, but burnt parts or repeated breaker trips should go to a technician.
If your camper AC fan is not working, the safest first steps are to cut power, check the breaker and thermostat, and look for obvious blockages or damaged wiring. In many cases, the fix is a loose connection, a failed capacitor, a dirty fan assembly, or a motor that has finally worn out.
- Start safe: Shut off power before opening the AC unit or touching internal parts.
- Most common clues: Humming, weak starts, or no response often point to capacitor, motor, or control issues.
- Check the basics: Breaker, fuse, thermostat mode, and campground voltage can all affect fan operation.
- Replace carefully: Match motor and capacitor specs exactly to the unit’s model and parts diagram.
- Know the limit: Burnt wiring, repeated trips, and compressor faults are best handled by a technician.
Camper AC Fan Not Working: What to Check First and What Usually Fixes It
Start with the simplest causes before assuming the whole unit is bad. A fan that hums, starts slowly, or only works sometimes usually points to a power, capacitor, or motor problem, while a fan that does nothing at all often means the issue is upstream in the thermostat, breaker, fuse, or control board.
How a Camper AC Fan Works and Why It Stops Spinning
A camper AC fan is part of a simple but layered electrical path. When the thermostat calls for cooling or fan-only operation, the control system sends power through wiring, a relay or control board, and often a capacitor before the fan motor starts turning the blower or condenser fan.
Power path basics: thermostat, control board, capacitor, motor, and wiring
Think of the fan as a chain. If any link fails, the blades may not move even though the rest of the air conditioner seems alive. The thermostat gives the command, the board or relay routes power, the capacitor helps the motor start, the motor spins the fan, and the wiring carries the current between them.
That is why a “dead fan” does not always mean a dead motor. A loose spade connector, a corroded terminal, or a weak capacitor can create the same symptom as a failed motor.
Common failure signs: humming, weak airflow, tripped breaker, or no response
Different symptoms point to different problems. A humming fan that does not spin often suggests a bad capacitor, a stuck blade, or a motor that is struggling to start. Weak airflow can mean a dirty filter, blocked vents, or a fan that is spinning too slowly.
If the breaker trips repeatedly, stop using the unit until you find the cause. That can indicate a short, a failing motor, or an electrical fault that needs professional attention.
Safety First: Power Off, Inspect, and Avoid Common Electrical Mistakes
RV air conditioners can hold dangerous voltage even after the unit is switched off. Before inspection, disconnect shore power, switch off the breaker, and give the system time to discharge.
When to unplug, shut off the breaker, and wait before opening the unit
Unplug the RV from shore power or turn off the pedestal supply first, then shut off the AC breaker inside the coach. If your setup includes a battery-backed control system, follow the owner’s manual for full shutdown steps before opening the ceiling assembly or rooftop shroud.
Waiting a few minutes helps reduce risk, but it does not make internal components safe to touch automatically. The safest assumption is that wiring and capacitors may still carry stored energy until verified otherwise.
Heat, damaged wires, and capacitor risks you should not ignore
Burn marks, melted insulation, and a hot electrical smell are warning signs, not minor annoyances. A failing capacitor can also retain a charge, so avoid handling it unless you know the correct discharge procedure from the manufacturer or a qualified technician.
Do not probe live wiring, bypass safety switches, or replace parts with the wrong voltage or rating. If you see scorch marks, swelling, or repeated breaker trips, stop and get professional help.
Step-by-Step Troubleshooting for a Camper AC Fan Not Working
Use a methodical approach so you do not replace the wrong part. The goal is to separate power issues, control issues, mechanical binding, and component failure.
Check the power source, breaker, fuse, and campground voltage
Begin outside the AC unit. Confirm that shore power is connected properly, the campground pedestal is supplying stable power, and the RV breaker has not tripped. Low voltage at the campsite can cause motors to struggle, overheat, or fail to start.
If other appliances are acting strangely at the same time, the problem may be with incoming power rather than the AC fan itself. That is a useful clue before you spend money on parts.
Inspect the thermostat settings and fan mode selection
It sounds basic, but mode selection matters. Make sure the thermostat is set to fan, cool, or auto correctly, and confirm the temperature setting is low enough to call for cooling if you are testing the full system.
If the fan works in one mode but not another, the issue may be in the control circuit rather than the motor. That narrows the troubleshooting path fast.
Test for blocked blades, dust buildup, and mechanical resistance
Look for leaves, nests, debris, or heavy dust around the blower and rooftop fan area. A blade that cannot spin freely can make the motor overheat or hum without starting.
Gently check for resistance only when power is fully off. If the fan feels stiff, noisy, or uneven, the bearings or motor may be worn.
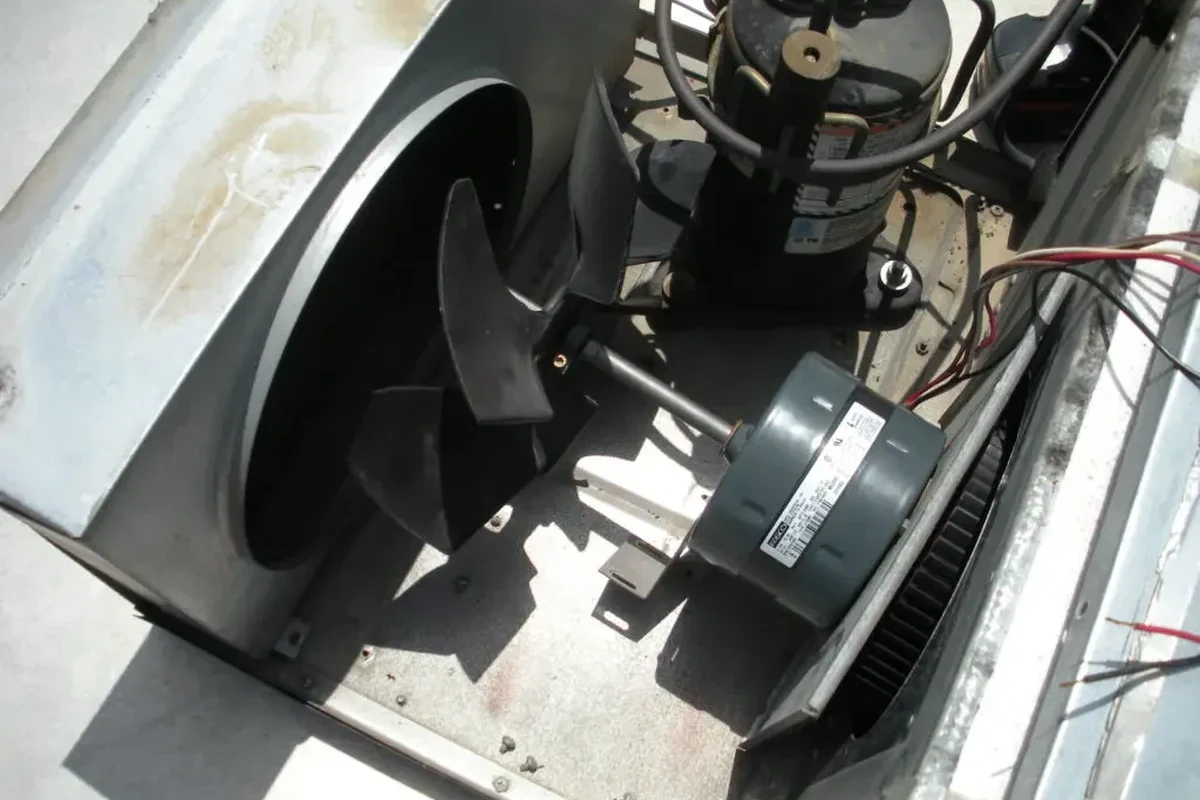
Look for loose connections, burnt terminals, and visible wire damage
Open the access panel only after power is off and the unit is safe to inspect. Look for disconnected plugs, loose spade terminals, cracked insulation, and any signs of heat damage on the board or wiring harness.
Many RV electrical problems are caused by vibration over time. A connector that looks slightly backed out or discolored can be enough to stop the fan from running reliably.
Evaluate the start/run capacitor and signs it may need replacement
A weak capacitor is one of the most common reasons a camper AC fan hums but will not spin. It may also cause slow starts, intermittent operation, or a fan that only moves if pushed manually by a technician during diagnosis.
Capacitors must match the required microfarads and voltage rating. If you are unsure how to verify that, check the unit’s manual or parts diagram before buying anything.
- Take photos before disconnecting any wires so you can restore the original layout.
- Use the model number on the AC label to find the correct parts diagram.
- Clean filters and vents before replacing electrical parts, since airflow problems can mimic fan failure.
Parts That Commonly Fail and How to Judge Replacement Value
Not every failed fan should be repaired the same way. The right choice depends on the exact part, the age of the unit, and whether the replacement cost is reasonable compared with a service call or full system repair.
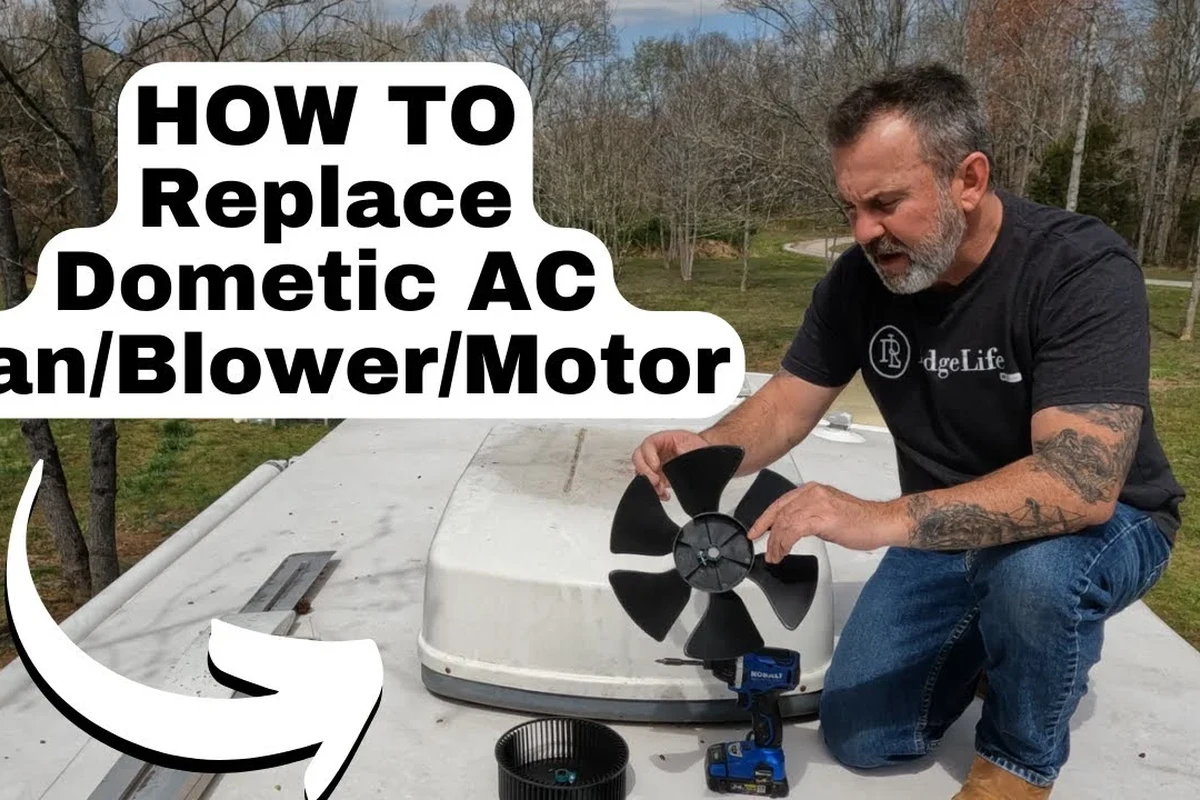
Fan motor replacement: fit, voltage, RPM, and mounting compatibility
When a motor is worn, the replacement has to match more than just size. Verify voltage, rotation direction, RPM, shaft style, mounting pattern, and connector type so the new motor fits and runs correctly.
If the motor is difficult to source or the rest of the AC unit is aging, compare the part cost plus labor against the value of keeping the system in service. A motor swap makes the most sense when the compressor, board, and blower housing are otherwise in good shape.
Capacitor replacement: matching microfarads, voltage rating, and quality
Capacitors are often cheaper to replace than motors, but the numbers must match closely. Use the exact microfarad value specified for your unit and a voltage rating that meets or exceeds the original requirement.
Do not assume a similar-looking capacitor is interchangeable. Wrong sizing can keep the fan from starting or damage the motor over time.
Control board or thermostat issues: when repair is worth it
If the fan does not respond to commands at all, the thermostat or control board may be the problem. These parts can be worth replacing if the AC unit is otherwise in good condition and the manufacturer still supports the model.
For older systems, it helps to compare part availability, warranty status, and the likelihood of additional failures. If multiple components are aging together, a technician may recommend a broader repair plan instead of a single part swap.
Who These Fixes Fit Best: DIY Owners vs. RV Service Help
Some checks are realistic for most RV owners. Others require tools, electrical knowledge, and safe access to rooftop components that many people should not attempt alone.
Best for simple maintenance and basic electrical checks
DIY-friendly tasks include checking breakers, confirming thermostat settings, cleaning filters, inspecting visible wiring, and looking for debris or obvious mechanical blockage. These steps are low risk when power is fully disconnected and the owner manual is followed.
If you are comfortable reading a parts label and matching a replacement component exactly, a capacitor or thermostat swap may also be manageable for some owners. Still, only proceed if the manufacturer’s instructions are clear and you understand the wiring layout.
Best left to a technician: burnt components, repeated breaker trips, or compressor issues
Call a technician if you see burnt terminals, melted insulation, or a control board with heat damage. Repeated breaker trips, compressor problems, or a fan motor that draws abnormal current also deserve professional diagnosis.
That is especially true when the AC is part of a larger system with multiple controls. A qualified RV service provider can test components in sequence instead of guessing.
Real-World Benefits, Limits, and Common Mistakes to Avoid
Getting the fan working again does more than restore comfort. It also helps the AC move air properly, which can reduce strain on the compressor and improve overall cooling performance.
Benefits of restoring airflow: comfort, cooling efficiency, and lower strain on the system
A functioning fan improves circulation through the camper, which matters in small spaces where heat builds quickly. Better airflow can also help the AC reach set temperature faster and avoid unnecessary cycling.
For travelers, pet owners, and anyone sleeping in the RV, that can make a real difference in comfort and noise. It also helps the system work as designed instead of laboring against poor airflow.
Limits of DIY troubleshooting and evidence gaps without professional diagnostics
Without proper electrical testing, you can confirm symptoms but not always prove the failed part. A humming sound, for example, may come from a capacitor, motor, or even a mechanical obstruction, and the exact cause may vary by model.
That is why the official manual, wiring diagram, and parts list matter so much. They help you avoid replacing a good component based on guesswork alone.
Common mistakes: wrong part sizing, poor wire splicing, and ignoring airflow restrictions
One of the biggest mistakes is buying a replacement part that “looks close enough.” Fan motors and capacitors are not universal, and the wrong match can create new problems.
Poor wire splicing is another issue, especially in a vibrating RV environment. Use proper connectors and follow the manufacturer’s wiring guidance rather than twisting wires together. Also, do not overlook clogged filters, blocked vents, or dirty coils, since airflow restrictions can make a healthy fan seem broken.
Preventive Care, Storage, and Final Recommendation
Once the fan is working again, a little maintenance can help prevent a repeat failure. Clean airflow paths, inspect visible wiring during routine RV checks, and store the coach in a way that reduces moisture and debris intrusion.
Cleaning, inspection, and seasonal storage tips to keep the fan working
Replace or clean filters on schedule, clear dust from vents, and inspect the rooftop unit for leaves or nesting material before each trip. During storage, follow the manufacturer’s guidance for covers, ventilation, and moisture control so the fan assembly does not seize up or corrode.
In many RV AC systems, poor airflow can make the fan and compressor work harder, which may raise noise, heat, and wear even when the unit still powers on.
What to verify before buying replacement parts or calling for service
Before ordering anything, confirm the exact model number, capacitor rating, motor specs, and connector style from the unit label or manual. If you are calling for service, note the symptoms, breaker behavior, and whether the fan fails in all modes or only one.
That information helps a technician diagnose the problem faster and reduces the chance of paying for the wrong repair.
Final recommendation: the fastest safe path to getting your camper AC fan running again
The fastest safe approach is to start with power, settings, airflow, and visible damage, then move to capacitor or motor replacement only if the symptoms and model details support it. If you find burnt parts, repeated electrical trips, or unclear wiring, stop there and let a qualified RV technician take over.
- Check breaker, thermostat, airflow, and visible wiring before replacing parts.
- Humming or weak starts often point to a capacitor or motor problem.
- Burnt components, repeated trips, and compressor issues are technician jobs.
Frequently Asked Questions
The problem may be in the thermostat, control board, capacitor, motor, or wiring between those parts. Visible power does not always mean the fan circuit is actually getting the signal it needs.
Yes. A weak or failed capacitor can cause humming, slow starts, or a fan that will not start at all.
Check the capacitor first if the fan hums or struggles to start, since that is often a simpler and less expensive fix. Replace the motor if it is stiff, noisy, overheating, or still fails after the capacitor is verified good.
Only after you disconnect power and follow the owner’s manual. If you see burnt wiring, damaged terminals, or a capacitor you are not sure how to handle, stop and call a technician.
That can happen when the motor is failing, wiring is damaged, or the unit is drawing too much current. Repeated trips are a sign to stop using the AC until it is diagnosed.
Confirm the exact model number, motor voltage, RPM, mounting style, and capacitor microfarads and voltage rating. The unit’s manual or parts diagram is the safest reference.