How to Attach Camera Strap Easily and Securely
Attach the strap to the correct lug or anchor, lock it fully, and test it before carrying the camera. If anything feels loose, twisted, or incompatible, stop and rethread or switch hardware.
If you want to know how to attach camera strap hardware the right way, the short answer is: match the strap type to your camera’s lugs, thread or clip it exactly as the manufacturer shows, and double-check every lock point before you let the camera hang free. A secure strap should support the camera without twisting, rubbing, or slipping out under normal use.
This guide walks through the common strap styles, the safest attachment methods, and the small checks that prevent expensive drops. Since camera bodies and strap systems vary, always confirm your model’s manual and accessory compatibility before relying on any setup.
- Match the hardware: Use the strap method designed for your camera’s lugs, rings, or anchors.
- Lock it fully: Every clip, buckle, or split ring should sit flat and secure before use.
- Check for interference: Make sure the strap does not block ports, screens, or battery doors.
- Inspect often: Fraying, cracks, or loose stitching mean it is time to replace the strap or.
How to Attach a Camera Strap: The Fast, Safe Answer for 2026

The safest approach is simple: identify whether your camera uses strap lugs, split rings, or a quick-release anchor system, then attach the strap using the exact fastening method designed for that hardware. If the strap feels loose, sits crooked, or blocks ports and controls, stop and re-route it before carrying the camera.
For most users, the “fast” answer is not about speed first. It is about choosing a setup that is easy to attach correctly, comfortable enough to wear, and secure enough that you do not need to think about it while moving around the house, commuting, or traveling.
What You Need Before You Start: Strap Types, Camera Lugs, and Compatibility
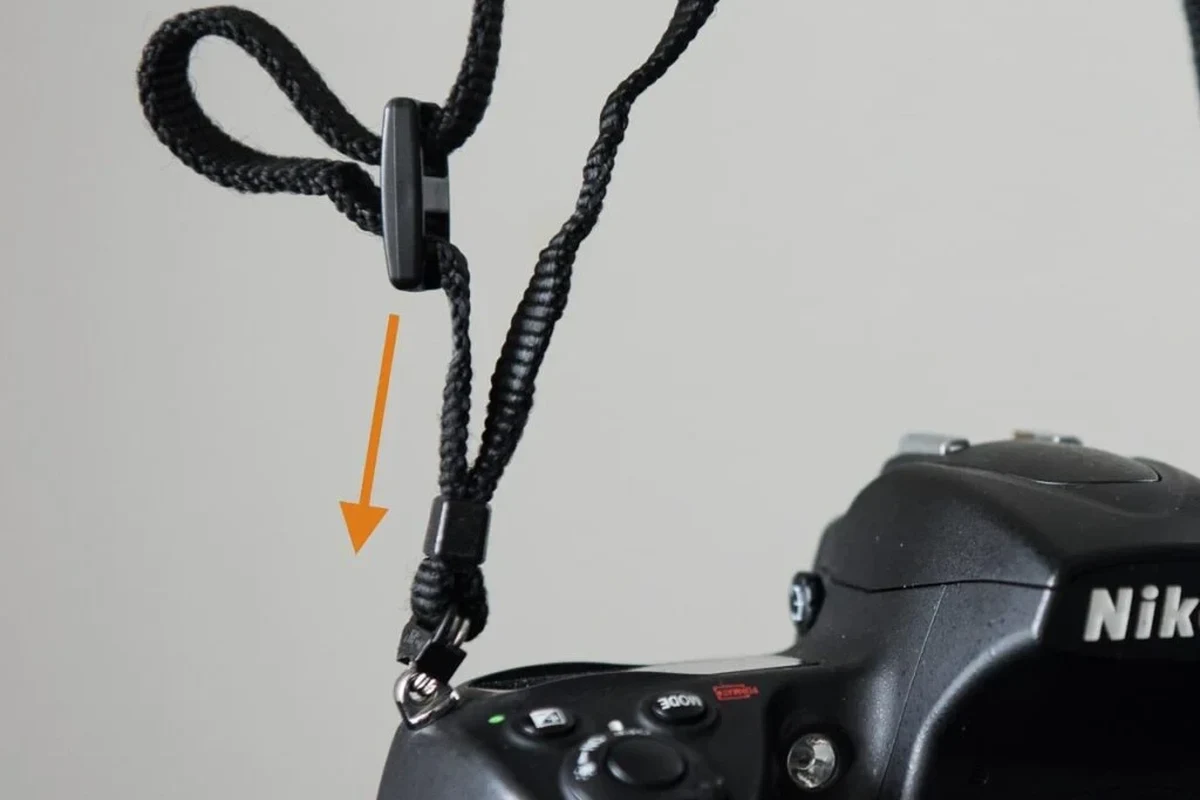
Before attaching anything, check the camera body for strap lugs or anchor points and confirm that the strap is made for that connection style. If you are using an aftermarket strap, the product page and manual should clearly state whether it supports your camera model or a standard lug design.
- Check your camera model’s strap lugs, anchor points, and manual
- Confirm the strap’s connection type, load rating, and included hardware
- Make sure the strap does not block battery doors, memory card access, ports, or screens
- Inspect stitching, clips, and rings before every new setup
Neck straps, wrist straps, sling straps, and hand straps
Neck straps spread weight across the neck or shoulder and are common for everyday carry. Wrist straps and hand straps keep the camera close to your hand, which can be useful for compact cameras, lighter mirrorless bodies, or situations where you want less bulk.
Sling straps usually rest across one shoulder and let the camera slide to the shooting position more quickly. The right choice depends on whether you value all-day comfort, quick access, or minimal size more than anything else.
Quick-release clips, split rings, and anchor systems
Traditional camera straps often use split rings or fixed loops that thread through strap lugs. Modern quick-release systems use anchors, clips, or locking connectors that let you remove the strap faster, but only if the locks are fully seated and the hardware is compatible.
Compatibility varies by brand and model. Some quick-release systems are proprietary, while others work across multiple straps and accessories, so check the manufacturer’s compatibility list before mixing parts.
If you are deciding between systems, prioritize security, ease of inspection, and whether the hardware interferes with your camera grip or accessories. A simpler connection is often better if you switch lenses often or carry the camera in tight spaces.
How to Attach a Camera Strap Step by Step
The basic process is the same for most cameras: prepare the strap, route it through the lug or anchor, secure the connection, and test it with a careful tug before carrying the camera. Do not skip the test pull, even if the strap looks correct at a glance.
Locate the camera’s strap lugs or anchor points and confirm they are clean, undamaged, and unobstructed.
Follow the strap’s routing path carefully so the webbing, ring, or anchor sits flat and locked.
Make sure the strap does not twist, rub, or press against buttons, ports, or screens.
Lift the camera gently and inspect every connection point before putting your full trust in the strap.
Attaching to traditional strap lugs
Traditional lugs are the most familiar attachment method. Feed the strap’s narrow end or connector through the lug, then route it back through the buckle or keeper so it cannot slide back out. The strap should lie flat, not folded or bunched, because twists can create wear and make the camera hang awkwardly.
If the strap end is stiff, work it through slowly instead of forcing it. Forcing tight webbing through a lug can fray the material or scratch nearby surfaces.
After threading, pull firmly on the strap in the direction of normal carry. If the connection shifts, opens, or looks uneven, re-thread it before using the camera outdoors or over hard flooring.
Using split rings without scratching the body
Split rings are common on many cameras and accessories, but they can scratch paint or metal if they are installed carelessly. Use the correct tool or a careful hand to open the ring just enough to pass it through the lug, then let it close fully before attaching the strap loop.
Do not pry split rings open aggressively or use tools that can slip into the camera body. If a ring feels too tight, stop and follow the manufacturer’s recommended accessory method.
When the strap is attached, make sure the ring can rotate without scraping the body in a way that bothers you. Some users prefer ring protectors or a different anchor system if they want to reduce cosmetic wear on a premium camera.
Installing quick-release anchors correctly
Quick-release anchors are convenient, but they only work if every locking piece is fully seated. Attach each anchor as directed, confirm the clip or button clicks into place, and inspect any wear indicators if the system includes them.
Stop using damaged clips, cracked plastic, bent metal parts, or frayed webbing. If a connector no longer locks cleanly, replace it according to the manufacturer’s guidance.
Many quick-release systems also include orientation rules, such as which side faces outward or how the anchor should sit to prevent accidental release. If your strap uses a proprietary connector, follow that brand’s instructions rather than assuming all clips work the same way.
How to Choose the Right Strap for Your Camera and Shooting Style
The best strap is the one that fits your camera weight, your carry habits, and the places where you actually shoot. A strap that feels perfect for a short walk may become annoying on a full day of travel or too bulky for a small camera bag.
Weight capacity, width, padding, and adjustability
Look for a strap that is clearly rated or intended for your camera’s size class, especially if you use a heavier body or lens. Wider straps usually spread weight better, while padding can improve comfort, but both can add bulk and slow access.
- Choose more padding for heavier kits and less bulk for compact travel setups.
- Pick adjustable length if you switch between neck carry, cross-body carry, and hand-held use.
- Check stitching, buckle quality, and anchor design before focusing on style.
Adjustability matters because the right strap length changes with clothing, body size, and shooting position. A strap that is too short may pull the camera into your chest, while one that is too long can swing into tables, doors, or railings.
Mirrorless, DSLR, compact, and travel camera fit
Mirrorless cameras often pair well with lighter straps or sling systems, but the exact fit depends on the body size and lens weight. DSLRs and larger zoom lenses usually benefit from wider, more supportive straps, especially if the camera will hang for long periods.
Compact cameras may work better with wrist straps or thin neck straps that keep the setup light. If you travel often, consider whether the strap packs flat, resists tangling, and stays comfortable when worn over a jacket or backpack strap.
Beginners and everyday users usually do best with a simple, well-padded strap that uses the camera’s standard lugs, because it is easier to inspect and less dependent on special hardware. More advanced users may prefer quick-release anchors if they frequently remove the strap for storage or tripod work.
Safety Checks, Common Mistakes, and How to Avoid Damage
Most strap problems come from rushed threading, loose connectors, or hardware that rubs against the camera body. A two-minute inspection can prevent a drop, a scratch, or a strap that slowly loosens over time.
Checking lock points, wear, and strap orientation
Before each outing, look closely at the stitching, buckle, ring, and anchor points. If any part looks shiny from wear, bent, cracked, or stretched, replace it or move to a different attachment method.
Also check that the strap hangs in the correct direction. A twisted strap can dig into your shoulder, make the camera spin, or put uneven force on one lug instead of sharing the load evenly.
Misthreading, loose anchors, and rubbing against ports or screens
One of the most common mistakes is threading the strap through the lug but forgetting the final return path through the keeper or buckle. Another is leaving a quick-release anchor half latched, which may look secure until the camera shifts.
Be careful that the strap does not block battery doors, memory card slots, USB ports, microphone inputs, or articulated screens. If it does, reroute the strap or choose a different style rather than forcing the camera to work around the accessory.
If you use a camera case, cage, or grip, test the strap with the full setup attached. Some accessories change clearance around the lugs or make certain anchor systems harder to use safely.
Real-World Benefits and Trade-Offs of Different Strap Setups
Different strap setups solve different problems. The best one for comfort is not always the best one for speed, and the most secure option is not always the lightest or easiest to pack.
Comfort, portability, access speed, and security
Neck straps are easy to understand and usually secure, but they can become tiring with heavier gear. Sling straps improve access and can feel less restrictive, though they may shift more while walking if they are not adjusted well.
Wrist straps and hand straps keep the camera close and reduce bulk, but they offer less support if you want to let the camera hang for long periods. Quick-release systems make storage and switching easier, but they add more parts that need regular inspection.
- Simple lug attachments are usually the easiest to inspect and trust.
- Quick-release systems are convenient, but only if the locks are fully seated.
- The right strap depends on camera weight, carry style, and how often you remove it.
When a strap is better than a wrist grip or camera bag carry
A strap is usually the better choice when you want the camera ready without opening a bag, especially for family outings, street photography, or travel days. It also helps when you need both hands free but still want the camera accessible.
A wrist grip may be enough for very light setups, while a bag carry approach can be better if you are protecting the camera during transit or moving through crowded spaces. Many users end up combining methods: a strap for active use and a bag for storage.
Care, Cleaning, Storage, and Replacement Guidance
Camera straps last longer when you keep them clean, dry, and untwisted. Dirt, sweat, and repeated friction can weaken webbing and make hardware harder to trust over time.
When to inspect stitching, hardware, and anchor wear
Inspect the strap regularly, especially after travel, rain, outdoor events, or heavy use. Look for loose stitching, cracked plastic, bent metal, fading that suggests UV exposure, and any anchor that no longer locks the way it should.
If the strap is part of a smart accessory ecosystem or a brand-specific system, check the manufacturer’s support pages for replacement parts, warranty terms, and any safety notices. That is especially important if the connector design depends on a specific clip or anchor shape.
How to store straps to prevent twisting, fraying, and odor
Store straps loosely coiled or laid flat instead of jammed into a tight pouch. Tight storage can create permanent twists, and moisture trapped in fabric can lead to odor or faster wear.
If a strap gets damp, let it dry fully before storing it. Do not use harsh cleaners unless the manufacturer specifically allows them, because some coatings, leather trims, and synthetic materials can be damaged by strong chemicals.
Final Recommendation: The Best Camera Strap Setup by User Type
The best camera strap setup depends on how you carry your gear and how much risk you want to accept in exchange for convenience. If you want the simplest, most dependable option, a standard neck or cross-body strap attached to the camera’s built-in lugs is usually the easiest place to start.
Best for beginners, travelers, street shooters, and heavier kits
Beginners usually benefit from a traditional strap with clear threading and minimal moving parts. Travelers often prefer a strap that packs flat, adjusts quickly, and does not block ports or battery doors.
Street shooters may like a sling or quick-release setup for faster access, while heavier kits often need wider padding and stronger hardware. Whatever you choose, confirm the strap’s compatibility, inspect the locks regularly, and replace worn parts before they become a problem.
Frequently Asked Questions
A simple strap that uses the camera’s built-in lugs is usually easiest for beginners. It has fewer parts to inspect and is easier to reattach correctly.
Check your camera manual and the strap maker’s compatibility list. Make sure the connection style matches your camera’s lugs, rings, or anchor points.
Yes, some straps can interfere with ports, memory card doors, or flip screens. If that happens, reroute the strap or choose a different style.
Inspect it before regular use and again after travel, rain, or heavy carry. Look for fraying, cracked hardware, loose stitching, or worn anchors.
They can be safe when installed correctly and inspected often. The lock must be fully seated, and the system should be compatible with your camera and strap.
Stop using it until you re-thread or reattach it correctly. A loose or twisted strap can shift unexpectedly and may damage the camera or cause a drop.