Can I Change a Wheel Speed Sensor Myself
Yes, many wheel speed sensors can be replaced at home if the part is accessible and you can work safely. The biggest risks are buying the wrong sensor, breaking rusted hardware, or missing a wiring or hub problem.
Yes, you often can change a wheel speed sensor yourself if you have basic hand tools, a safe way to lift the vehicle, and patience for rusted fasteners or tight access. The job is usually straightforward on some cars and trucks, but on others the sensor is buried in the hub, knuckle, or wiring harness enough that a shop may be the smarter choice.
- Fitment matters most: Match the exact vehicle, axle position, connector, and mounting style before buying.
- Access determines difficulty: A sensor on an exposed hub is much easier than one buried behind corroded.
- Don’t ignore the wiring: A damaged harness or connector can cause the same warning light as a failed.
- Scan tools help: Clearing codes and checking which wheel is reporting a fault can prevent wasted parts.
- Safety comes first: Use jack stands, follow the manual, and stop if rust or disassembly gets beyond.
Can I Change a Wheel Speed Sensor Myself? Quick Answer and What to Expect
A wheel speed sensor is one of those parts that can look simple on paper and still turn into a frustrating repair in the driveway. If the sensor is easy to reach and the connector is in good shape, DIY replacement can make sense; if the sensor is seized, the wiring is damaged, or the vehicle needs more than a basic swap, the difficulty rises quickly.
How a Wheel Speed Sensor Works and Why It Matters for ABS and Traction Control
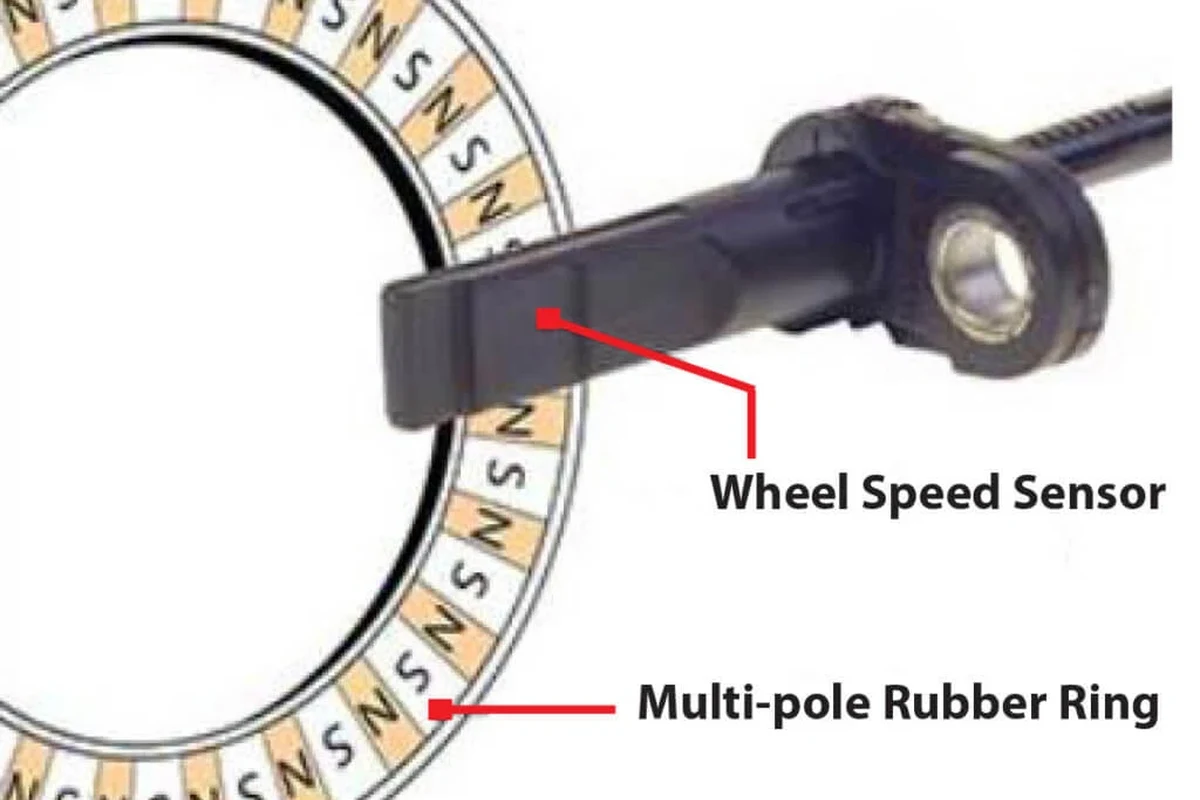
Wheel speed sensors monitor how fast each wheel is turning and send that data to the ABS and stability systems. The vehicle uses that information to help prevent wheel lockup during braking and to reduce wheel spin when traction is low.
In many vehicles, a bad sensor can trigger ABS, traction control, or stability warning lights. Sometimes the car still drives normally, but the safety systems may be reduced or disabled until the fault is fixed.
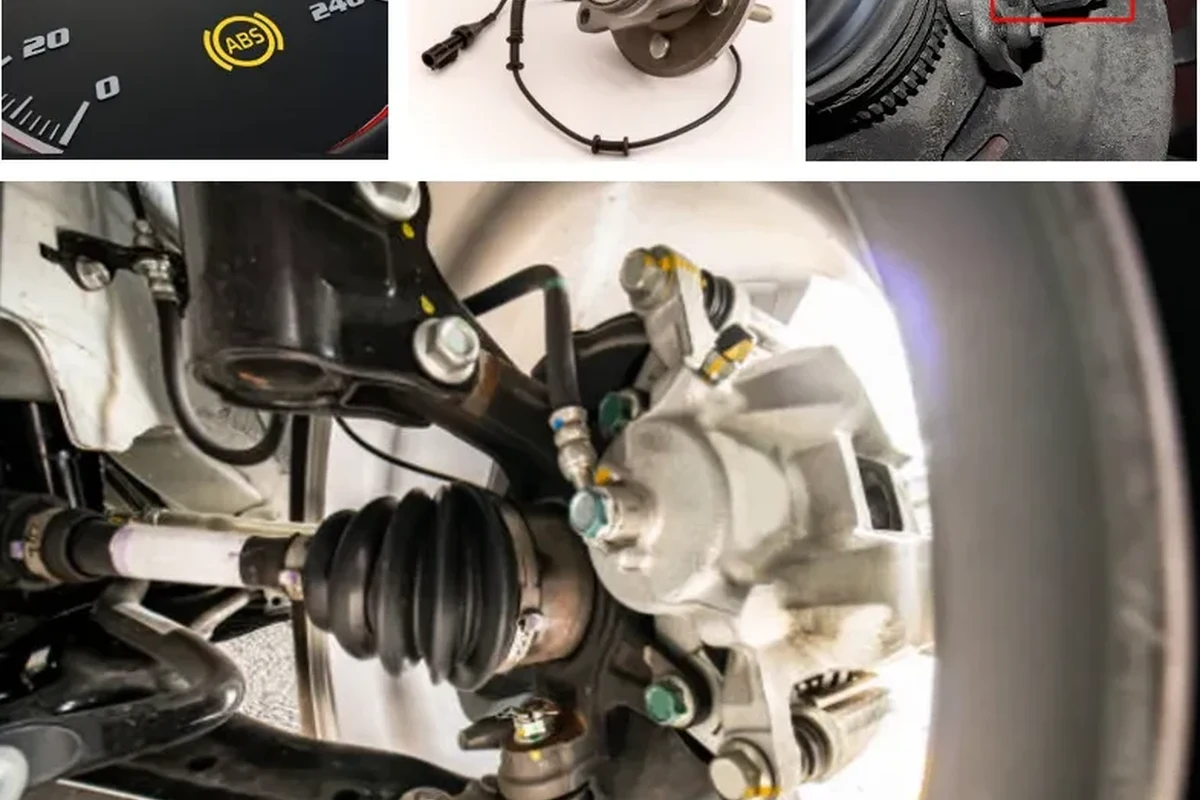
Some wheel speed sensors read a toothed tone ring, while others work with a magnetic encoder built into the hub or bearing assembly.
When DIY Replacement Makes Sense: Skill Level, Tools, and Vehicle Fit
DIY replacement makes sense when the sensor is mounted externally, the wiring is intact, and the fasteners are reachable with common tools. You should also be comfortable removing a wheel, supporting the vehicle safely, and working carefully around brake parts and suspension components.
Before starting, check the service manual or a reliable repair database for your exact vehicle. Wheel speed sensor design varies a lot by make, model, trim, drivetrain, and axle position, so a “simple” front sensor on one car may be a much harder rear sensor on another.
Vehicles and sensor locations that are usually easier to service
Vehicles with exposed sensors near the hub or knuckle are usually more DIY-friendly. If the connector is easy to unplug and the sensor is held in place by a single bolt, the replacement is often manageable for a home mechanic.
Front sensors on some older or simpler vehicles are often easier than rear sensors integrated into hub assemblies. That said, the exact layout matters more than the axle location, so always verify the mounting style first.
Signs the job may be better left to a professional
If the sensor is fused in place by rust, the harness is brittle, or the connector is hidden behind suspension parts, the repair can become time-consuming. It is also worth considering a shop if the vehicle needs wheel bearing work, hub removal, or ABS diagnosis beyond the sensor itself.
Do not work under a vehicle supported only by a jack. Use rated jack stands on solid ground and follow the manufacturer’s lifting points and safety instructions.
Key Specs and Decision Criteria Before You Buy a Replacement Sensor
Wheel speed sensors are not universal. The right replacement depends on connector shape, wire length, mounting style, left/right position, and whether the sensor is a standalone part or part of a hub assembly.
- Confirm the exact vehicle year, make, model, trim, and axle position
- Match the connector, mounting tab, and wire length to the original part
- Check whether the sensor is separate or integrated into the hub or bearing
- Review the service manual, warranty terms, and return policy before opening the package
OEM vs aftermarket: compatibility, connector type, and mounting style
OEM sensors usually offer the safest fitment path because they are designed for the exact application. Aftermarket sensors can be a good value, but compatibility is where mistakes happen most often, especially with connectors that look similar but are pinned differently.
Pay close attention to the mounting style. Some sensors bolt in with a small fastener, while others clip into a bracket or integrate into the wheel hub assembly, which changes the replacement process significantly.
Reading part numbers, wheel hub design, and left/right fitment
Use the old sensor’s part number, VIN lookup, or a verified parts catalog to confirm the replacement. Left and right sensors are not always interchangeable, and front and rear applications may differ even when the connector looks the same.
Also inspect the wheel hub design. If the sensor reads an encoder ring built into the bearing, replacing only the sensor will not solve a damaged tone-ring or hub issue.
Step-by-Step Setup Guide: Replacing a Wheel Speed Sensor Safely
The exact steps vary by vehicle, but the basic process is similar: lift the car safely, remove the wheel if needed, unplug the sensor, remove the fastener, clean the mounting area, install the new part, and verify that the warning light clears after a proper scan and road test.
Preparation, jack safety, and disconnecting the battery when needed
Start by parking on level ground, setting the parking brake, and chocking the wheels. If the service manual recommends disconnecting the battery or if the sensor wiring runs near other electrical components, follow the manual’s guidance before touching connectors.
Gather the tools first: jack, jack stands, lug wrench, sockets, penetrating oil if appropriate, a soft brush, and a scan tool if you have one. A repair manual is just as important as the tools because it tells you where the sensor sits and how the harness is routed.
- Take a photo of the sensor routing before removal so the new harness goes back the same way
- Use penetrating oil carefully on rusted fasteners and give it time to work
- Keep the connector clean and dry while the part is unplugged
Removing the old sensor, cleaning the mounting area, and installing the new one
Unplug the connector gently and release any retaining clips before pulling on the harness. If the sensor is stuck, avoid forcing it; rust and debris can break the sensor body or damage the mounting bore.
Once removed, clean the mounting surface and inspect the area for corrosion, broken clips, or debris on the tone ring or encoder surface. Install the new sensor straight and secure it with the correct fastener torque from the manual rather than guessing.
If the old sensor failed because the harness was rubbed through, pinched, or contaminated, replacing only the sensor may not fix the problem. Check the entire wire path before closing everything up.
Reassembly, torque checks, and clearing warning lights or codes
After installation, reconnect the harness, secure the clips, reinstall the wheel, and torque the lug nuts to the manufacturer specification. Lower the vehicle safely before doing a final check of the wiring path and nearby brake components.
Many vehicles need the fault code cleared with a scan tool before the warning light turns off. In some cases, the light clears after a short drive, but if it returns, the issue may be wiring, hub-related, or elsewhere in the ABS system.
Common Mistakes, Troubleshooting, and How to Avoid Repeat Failures
The most common DIY mistake is assuming the sensor is the only problem. Wheel speed faults can come from damaged wiring, rust, a bad hub encoder, corrosion in the connector, or even a poor installation on the new part.
Damaged wiring, rusted fasteners, and contamination on the tone ring
Rusted hardware often breaks before it loosens, especially on older vehicles or in areas that use road salt. If a fastener snaps or the sensor bore is badly corroded, the repair may require additional parts or professional extraction tools.
Dirt, grease, and metal debris can also interfere with the signal. Clean only as directed by the service manual, and avoid aggressive scraping that could damage the tone ring or encoder surface.
Intermittent ABS lights, scan tool checks, and when the issue is not the sensor
An intermittent ABS light can point to a wiring break that appears only when the suspension moves, a weak connector, or a hub issue that changes with wheel speed. A scan tool helps identify which wheel is reporting a fault and whether the code returns after clearing.
If the code comes back immediately after installation, recheck the connector seating, harness routing, and part number compatibility. If all of that is correct, the problem may be in the hub, tone ring, or ABS module rather than the sensor itself.
Scan tool behavior, code names, and relearn steps vary by vehicle. Always confirm the exact diagnostic procedure in the official service information for your model.
Value, Maintenance, and Safe Use After the Repair
Doing the replacement yourself can save labor costs, but the real value depends on whether the repair is completed correctly the first time. A low-cost part that does not fit, or a sensor installed on a corroded mounting point, can erase any savings quickly.
Cost savings vs shop labor, durability expectations, and inspection intervals
DIY replacement is most worthwhile when the sensor is easy to reach and the diagnosis is solid. If you are still unsure which wheel is faulty, the cost of trial-and-error parts can outweigh the labor savings from doing it at home.
Durability depends on climate, road salt exposure, water intrusion, and harness routing. It is smart to inspect the sensor area during brake jobs, tire rotations, or suspension work, especially if the vehicle has a history of corrosion.
DIY replacement is best for owners who can verify fitment, lift the vehicle safely, and access the sensor without major disassembly. If the sensor is integrated into the hub or the wiring is damaged, a professional repair is usually the better route.
Protecting the sensor and harness during future brake or suspension work
Wheel speed sensor wiring is easy to snag during brake pad, rotor, strut, or control arm work. Before moving suspension parts, check where the harness clips into place and avoid letting it hang under tension.
When cleaning the wheel area, keep pressure washers, harsh solvents, and heavy grease away from the connector and sensor body unless the manual says otherwise. A little care during routine maintenance can prevent repeat ABS faults later.
- DIY replacement is possible, but fitment and access matter more than the part price.
- Verify the exact sensor style, connector, and left/right or front/rear application before buying.
- If the wiring, hub, or tone ring is damaged, replacing the sensor alone may not solve the problem.
Final Recommendation: Should You Change a Wheel Speed Sensor Yourself in 2026?
If you can safely lift the vehicle, confirm the exact part, and reach the sensor without major disassembly, this is often a reasonable DIY job. If the sensor is rusted in place, integrated into the hub, or tied to broader ABS diagnostics, a professional repair is more likely to save time and frustration.
For most readers, the best approach is to verify fitment first, inspect the wiring and mounting area second, and only then decide whether the repair belongs in the driveway or the shop.
Frequently Asked Questions
Yes, if the sensor is accessible, the wiring is intact, and you can safely lift the vehicle. If the fault may involve the hub, tone ring, or ABS module, diagnosis first is the safer move.
Most jobs need basic hand tools, a jack, jack stands, a lug wrench, and sometimes penetrating oil or a scan tool. The exact tools depend on how the sensor is mounted and how much corrosion is present.
Match the vehicle year, make, model, trim, drivetrain, and axle position, then verify connector type, mounting style, and part number. Left/right fitment can also matter on some vehicles.
The code may need to be cleared with a scan tool, or the issue may be in the wiring, hub, tone ring, or connector. Recheck fitment and the full harness path if the light returns.
OEM parts usually reduce fitment risk because they are made for the exact application. Aftermarket sensors can work well, but only if the connector, mounting style, and part number match exactly.
Stop if the sensor is seized, the fasteners break, the wiring is damaged, or the vehicle needs hub or ABS diagnosis beyond a simple swap. A shop is also the better choice if you are not comfortable working safely under the car.