How to Make a Camera Obscura in Simple Easy Steps
Make a camera obscura by darkening a box or room, adding a tiny pinhole, and projecting the scene onto a white surface. The simplest builds are low-cost, educational, and easy to adjust for sharper or brighter images.
If you want to know how to make a camera obscura, the simplest answer is this: create a dark space, add a tiny pinhole, and let light project an upside-down image onto a bright surface inside. You can build one from a shoebox, a cardboard tube, or even a room with a covered window, depending on how large and immersive you want the effect to be.
This classic optics project is easy to understand, inexpensive to try, and surprisingly useful for learning how lenses and light behave. Below, Ethan Walker explains the parts, setup choices, and the safest way to build one without overcomplicating the process.
- Start with darkness: The better you block stray light, the clearer the projection will be.
- Use a small, clean pinhole: Hole size affects sharpness more than almost anything else.
- Choose the right surface: Matte white paper or a light wall makes the image easier to see.
- Match the build to your goal: Boxes are simple; rooms create larger, more dramatic projections.
How to Make a Camera Obscura: The Simple Answer and What You Need
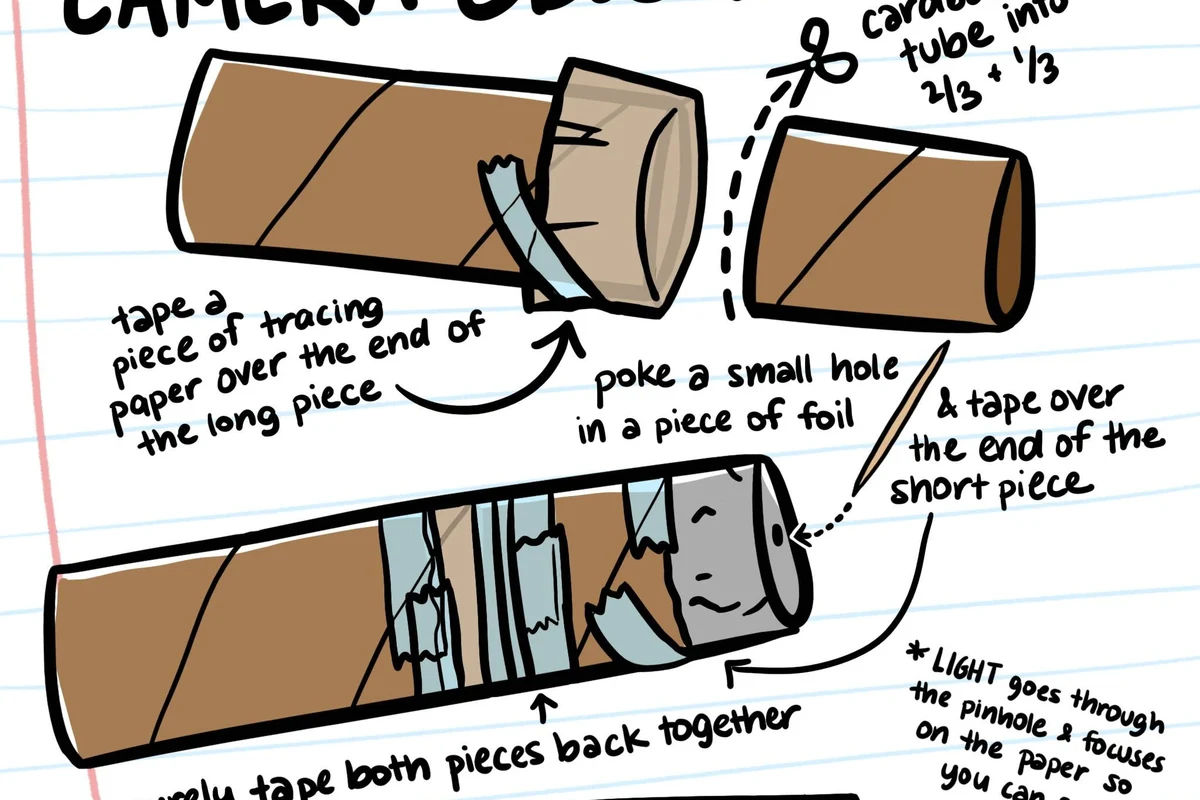
A camera obscura works best when you keep the build simple: a light-tight container or room, a very small hole, and a projection surface such as white paper, matte board, or a wall. The size of the build changes the image brightness and viewing comfort, but the core idea stays the same.
If you want a quick project for a classroom, hobby corner, or rainy-day demo, a shoebox version is usually the easiest starting point. If you want a more dramatic experience, a room-based setup gives you a larger image and a more memorable viewing area.
What a Camera Obscura Is and How It Works
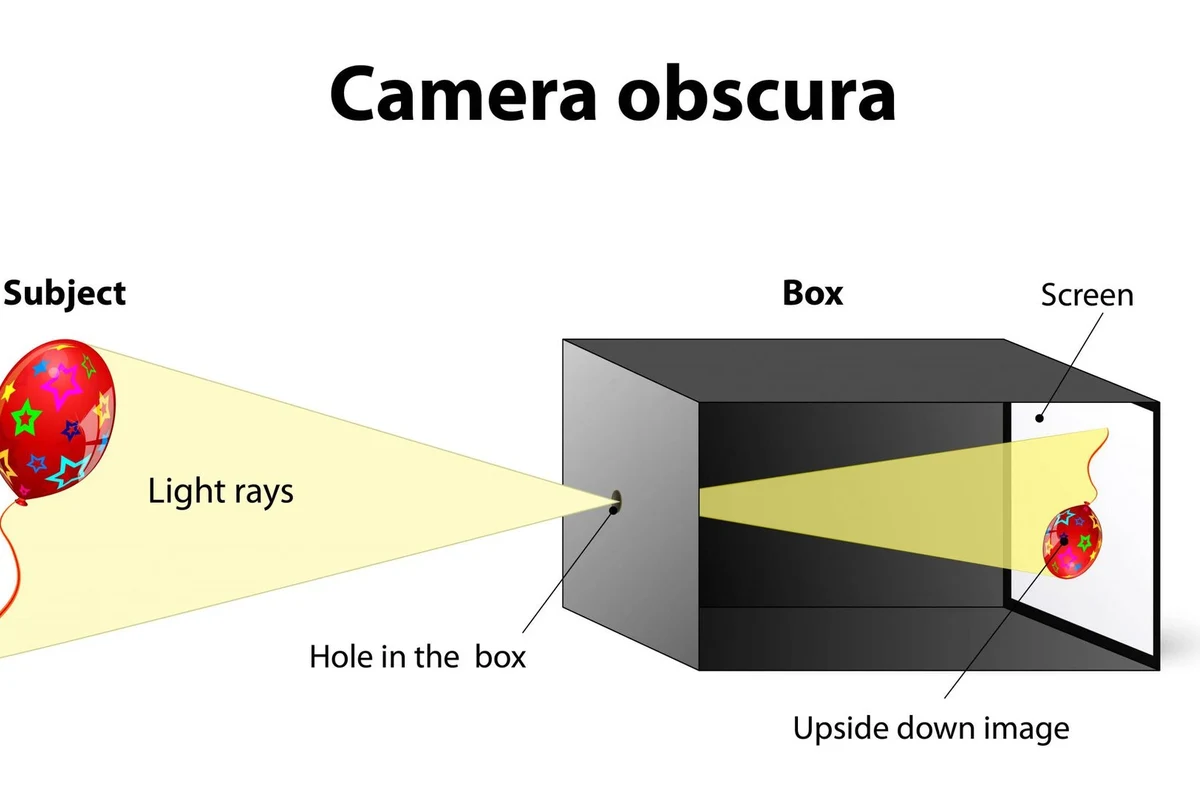
A camera obscura is an optical device that projects the outside world into a darkened space through a tiny opening. Light from each point in the scene travels in straight lines, so the rays cross at the pinhole and flip the image upside down on the opposite surface.
The image is usually dimmer than normal room light, which is why the space must be dark and the hole must be small. If the hole is too large, the image gets brighter but blurrier; if it is too small, the image can become sharper but harder to see.
The camera obscura predates modern cameras and helped early scientists understand how images form before lenses and digital sensors became common.
This is also why the project fits naturally into smart home and home-learning content on GadgetMakersBlog: it demonstrates light control, placement, and viewing conditions in a very practical way. For readers interested in other home-tech projects, a similar attention to setup matters in guides like smart lights and robot vacuum Wi‑Fi setup, where environment and positioning strongly affect results.
Materials, Sizes, and Setup Choices for Your Camera Obscura
You do not need specialized parts to build a camera obscura. Most versions can be made from basic household materials, but your choice of container or room will determine how much light you need to block and how comfortable the viewing area will be.
Choosing a Box, Room, or Portable Build
A box build is the easiest place to start because it is compact, portable, and simple to darken. A room build is better if you want a larger projection and can temporarily cover windows, vents, and door gaps.
- Box builds are low-cost and easy to store
- Room builds create a much larger image
- Portable builds are good for classrooms and demos
- Boxes can be too dim if they are too small
- Rooms take more time to seal from light leaks
- Portable builds may need more careful alignment
If you are building for kids or a shared home, a smaller portable version is often the safest and easiest to manage. If your goal is to study image formation in more detail, a larger setup gives you more room to adjust the viewing screen and pinhole position.
Recommended Dimensions, Light Control, and Surface Options
There is no single perfect size, because the best dimensions depend on your space and how bright the outside scene is. In general, a longer distance between the pinhole and the projection surface creates a larger image, while a shorter distance usually makes the image brighter and less spread out.
- Pick a box, room, or tube that can be darkened well
- Choose a white or matte projection surface for easier viewing
- Gather opaque tape, scissors or a craft knife, and black paper or paint if needed
- Plan how you will block extra light around seams, edges, and openings
White paper is the easiest projection surface for most beginners, but matte poster board or a smooth painted wall can also work. Glossy surfaces reflect too much stray light, which can make the image harder to see clearly.
Step-by-Step Guide to Building a Camera Obscura
The basic process is straightforward: darken the container or room, make a tiny pinhole, and create a surface where the image can appear. The details matter more than the tools, so take time to seal light leaks and keep the opening clean.
Line the inside with dark material if needed, close off extra openings, and make sure the projection area is easy to see from your viewing position.
Make one small, clean hole in opaque material such as foil, thin card, or black paper, then mount it securely over the opening.
Adjust the distance, seal stray light, and test different hole sizes until the picture is as sharp and visible as possible.
Preparing the Container or Space
Start by making the inside as dark as possible. For a box, tape or glue black paper inside if the interior is light-colored. For a room, cover windows with thick fabric, cardboard, or blackout material, and close any gaps around doors as much as practical.
Use a flashlight in a dark room to spot light leaks before you finish the build. Small gaps around seams often matter more than the main opening.
If you are using a room, choose a flat wall or large sheet as the projection surface. The farther the surface sits from the pinhole, the larger the image will appear, but the dimmer it may become.
Making the Pinhole and Projection Surface
Cut a small opening in the outside layer of the box or covering, then place a thin piece of foil or stiff paper over it and make a single pinhole with a needle or fine pin. Keep the hole neat and avoid tearing the material, because rough edges can reduce image quality.
On the opposite side, attach a white card, paper, or matte surface where the image will land. If you are making a room obscura, the wall itself can serve as the screen if it is light-colored and not too reflective.
Do not aim a camera obscura at the sun through an unfiltered opening, and never look directly at the sun through any optical setup. If you want a solar demonstration, use only safe, approved viewing methods and follow official guidance.
Blocking Light and Fine-Tuning the Image
Once the pinhole is in place, close the box or darken the room and check the image. If you see multiple bright spots or washed-out edges, there is probably too much stray light entering the build.
Move the projection surface slightly closer or farther from the hole to balance brightness and sharpness. If the image is blurry, the hole may be too large; if it is too faint, the hole may be too small or the room may not be dark enough.
- Use matte white paper for the clearest beginner-friendly projection
- Keep the pinhole centered and clean for more even image shape
- Work in a shaded or indoor area first, then refine the setup outdoors if needed
- Seal seams with tape before changing the hole size
Who This Project Fits Best and When It’s Worth Making
A camera obscura is a great fit for students, parents, teachers, hobbyists, and anyone who wants a low-cost optics demonstration. It is especially useful if you like hands-on projects that explain a scientific concept without requiring electronics, apps, or power.
It is worth making when you want a visual learning tool, a creative photography reference, or a simple weekend project with a clear payoff. It is less useful if you want a bright, high-detail image in a fully lit room, because the effect depends on darkness and careful light control.
For households already exploring practical tech projects, the same “fit first, then features” mindset applies to other gear choices too. If you are comparing learning tools or home gadgets, it helps to think about setup effort, space, and maintenance the way you would when evaluating headphones for kids or deciding whether a device is easy to live with long term.
Common Mistakes, Safety Tips, and Troubleshooting
Most camera obscura problems come from three things: too much light, a hole that is not the right size, or a projection surface that is hard to see. The good news is that all three are usually fixable without rebuilding the entire project.
Fixing Blurry, Dim, or Upside-Down Images
An upside-down image is normal and shows that the optics are working. If the image is blurry, try a smaller hole and smoother hole edges; if it is dim, reduce stray light and shorten the distance to the projection surface a little.
If the image looks distorted, check whether the hole is off-center or whether the screen is tilted. A slight adjustment in angle can make the scene easier to recognize, especially in a room-sized build.
Stop using damaged scissors, cracked craft blades, loose tape, or unstable supports, and follow normal household safety practices when cutting, taping, or mounting parts.
Safe Use, Storage, and Care After Use
After use, remove any sharp tools, fold or store the box flat if possible, and keep the pinhole area from bending or tearing. If you made a room setup, take down blackout materials carefully so you do not damage curtains, trim, or adhesive-backed surfaces.
Store the project in a dry place to prevent warping, especially if you used cardboard or paper. For long-term use, it helps to label the pinhole side and projection side so you can rebuild the same setup later without guessing.
Real-World Benefits, Limitations, and Value Compared With Other DIY Optics
The biggest benefit of a camera obscura is how clearly it demonstrates a core optical principle with almost no hardware. It is also adaptable: you can make it tiny, portable, or room-sized depending on your goal.
The main limitation is brightness. Compared with lens-based DIY optics, a pinhole setup usually gives you a softer, dimmer image, so it is better for learning and observing than for capturing fine detail.
If you want a simple educational project with strong visual payoff, it delivers excellent value. If you want a sharper or more camera-like image, a lens-based project may be a better next step, but it will also require more parts and more careful alignment.
- A camera obscura needs a dark space, a tiny pinhole, and a projection surface.
- Smaller holes improve sharpness, while better light control improves visibility.
- Box builds are easiest for beginners; room builds create the most dramatic image.
Final Recommendation: Should You Try Making a Camera Obscura?
Yes, if you want a simple, low-cost project that clearly shows how light forms an image. It is one of the easiest optics builds to understand, and the setup can be scaled from a shoebox to a room without changing the basic idea.
If you are looking for a bright, polished, camera-like result, this is not the right project. But if your goal is to learn, experiment, and see a classic optical effect with minimal materials, a camera obscura is absolutely worth making.
Frequently Asked Questions
The easiest version uses a shoebox or other light-tight box, a tiny pinhole, and white paper on the opposite side as the screen. Keep the inside dark and seal any extra light leaks for the clearest result.
Light travels in straight lines, so rays from the top and bottom of the scene cross at the pinhole. That crossing flips the projected image upside down and left to right.
The hole should be small enough to stay sharp but not so tiny that the image becomes too dim. If the picture is blurry, try a cleaner, smaller hole; if it is too dark, check for light leaks and reduce the viewing distance.
Yes, a room can work very well if you can cover windows, close gaps, and direct the image onto a white wall or sheet. Larger setups create a more dramatic image but take more effort to darken.
Matte white paper, poster board, or a light-colored wall usually works best because they reflect the image without much glare. Glossy surfaces can make the picture harder to see.
Do not look directly at the sun through any optical setup, and do not improvise unsafe solar viewing methods. If you want to observe the sun, use only approved safe viewing practices and follow official guidance.