Shark Robot Vacuum Cliff Sensor Replacement Guide
Replace a Shark robot vacuum cliff sensor only after cleaning, floor-surface checks, and basic troubleshooting fail. The safest repair depends on matching the exact Shark model, connector, cable length, board shape, and mounting points—then testing the robot away from real stairs after reassembly.
A replacement set marketed for selected Shark IQ models, including RV1001AE, RV912S, RV913S, RV1000S, AV1002AE, AV1010AE, and related models.
Long magnetic security bits from T6 through T40 help cover the tamper-resistant screws found on many Shark vacuum housings.
Dust, black rugs, shiny floors, bright light, a loose bottom cover, or a software issue can look like a failed cliff sensor.
A Shark robot vacuum cliff sensor should be replaced only after the sensor windows are clean, the robot has been tested on a light-colored matte floor, the bottom cover is seated correctly, and the error still returns. Shark notes that dark carpets or surfaces can trigger cliff detection on some models even when the hardware is working normally.
When replacement is justified, match the exact model number printed on the underside of the robot. Similar-looking Shark robots may use different sensor boards, connector keys, cable lengths, or screw locations.
- Diagnose first: Dirt, dark rugs, reflective floors, lighting, wheel problems, and firmware behavior can imitate sensor failure.
- Verify the exact fit: Match the model, connector, wire length, board shape, and mounting points.
- Repair safely: Power off the robot, remove it from the dock, and disconnect the battery when the model-specific service procedure permits.
- Use the right tools: Security Torx screws may require long tamper-resistant bits.
- Test carefully: Do not use actual stairs as the first post-repair test.
- Know when to stop: Battery swelling, burned wiring, corrosion, strong odors, or charging faults require professional service.
Cliff sensors are downward-facing safety sensors located around the underside of a robot vacuum. They help the robot detect stairs, ledges, sunken rooms, and other drop-offs. Most systems emit infrared light and measure how much light reflects from the floor.
A normal nearby surface produces a usable reflection. A weak or missing return may look like an open drop, so the robot slows, stops, or turns away. This system works with wheel sensors, navigation software, bump sensors, mapping hardware, and dock-return behavior.
Because the cliff sensor is part of a safety system, bypassing it or covering it is not a good general repair strategy. A temporary workaround that prevents false alerts on a dark rug may also prevent the robot from detecting a real staircase.
Start with low-risk checks. These solve many cliff-related problems without disassembly.
- Move the robot to a light-colored matte floor. Dark or highly reflective flooring can confuse cliff detection.
- Clean the sensor windows. Use a clean, dry microfiber cloth. Do not soak the sensors or spray liquid into the robot.
- Remove underside debris. Hair around wheels, packed dust, or a loose cover can change the robot’s height and sensor angle.
- Check the wheels. Each wheel should move and spring normally so the robot sits level.
- Restart the robot. Follow the model’s normal power-cycle instructions.
- Review the Shark app. Note the exact error wording, update prompts, and whether the error appears on every floor.
- Test away from stairs. Use a supervised flat-floor run to see whether the warning returns.
| Symptom | Possible cause | Best first action |
|---|---|---|
| Stops only on a black rug | Dark surface absorbs infrared light | Test on a light matte floor and use a no-go zone if needed. |
| Cliff error on every floor | Dirty window, loose connection, misalignment, or failed sensor | Clean, inspect cover seating, restart, then consider internal inspection. |
| Robot spins or backs away repeatedly | One sensor reading differs from the others | Clean every cliff sensor, not just the visibly dirty one. |
| Problem began after reassembly | Pinched cable, loose plug, shifted board, or uneven cover | Stop using the robot and inspect the previous repair. |
| Error appears near bright windows | Strong light affecting optical readings | Retest under normal indoor lighting. |
The Goodsby replacement listing is aimed at selected Shark IQ robots. The compatibility information associated with ASIN B0BGX5261W lists models including:
| Listed compatible models | Important check before ordering |
|---|---|
| RV1001AE, RV912S, RV913S, RV1000S | Compare the old sensor board, connector, cable, and screw tabs. |
| QR1000SG, QR1000SB | Confirm the full model label, not only the Shark IQ product name. |
| AV1002AE, AV1010AE, AV911S | Check the listing images against the original part. |
| UR1000SR, UR1005AE | Verify the connector key and cable length. |
| RV1101ARUS, UR1105ARUS | Confirm the internal revision when possible. |

This replacement set is marketed for selected Shark IQ robot vacuums. It is the most relevant purchase when the exact model matches, cleaning did not solve the problem, and you have compared the original sensor assembly with the listing photos.
- Replacement set for multiple listed Shark IQ models
- Targets the exact component covered by this guide
- Can restore cliff detection when the original sensors have failed
- Useful when official parts are difficult to source
- Third-party replacement rather than a universal Shark part
- Exact model and internal revision still matter
- Installation requires opening the robot
- A new sensor will not fix dark-floor false detection or main-board faults
| Option | Best for | Main advantage | Main risk |
|---|---|---|---|
| OEM or official service part | Owners prioritizing the closest fit | Stronger compatibility confidence | May be unavailable or more expensive. |
| Third-party sensor set | Older listed models with limited official parts | Easier online availability | Revision or connector mismatch. |
| Professional repair | Battery, board, wiring, or multi-sensor faults | Safer diagnosis of overlapping problems | Higher labor cost. |
| Replace the robot | Old robots with battery, dock, and board problems | Avoids repeated repair spending | Highest upfront cost. |
Work on a clean, well-lit table. Use a screw container or magnetic mat and photograph the underside before removing anything. Shark models can use different screw lengths, so keep each screw organized by location.
A typical repair setup may include:
- Long security Torx bits
- A compatible hand driver or low-torque bit holder
- Plastic opening tool
- Fine tweezers
- Dry microfiber cloth
- Small screw tray
- Phone camera for cable-routing photos
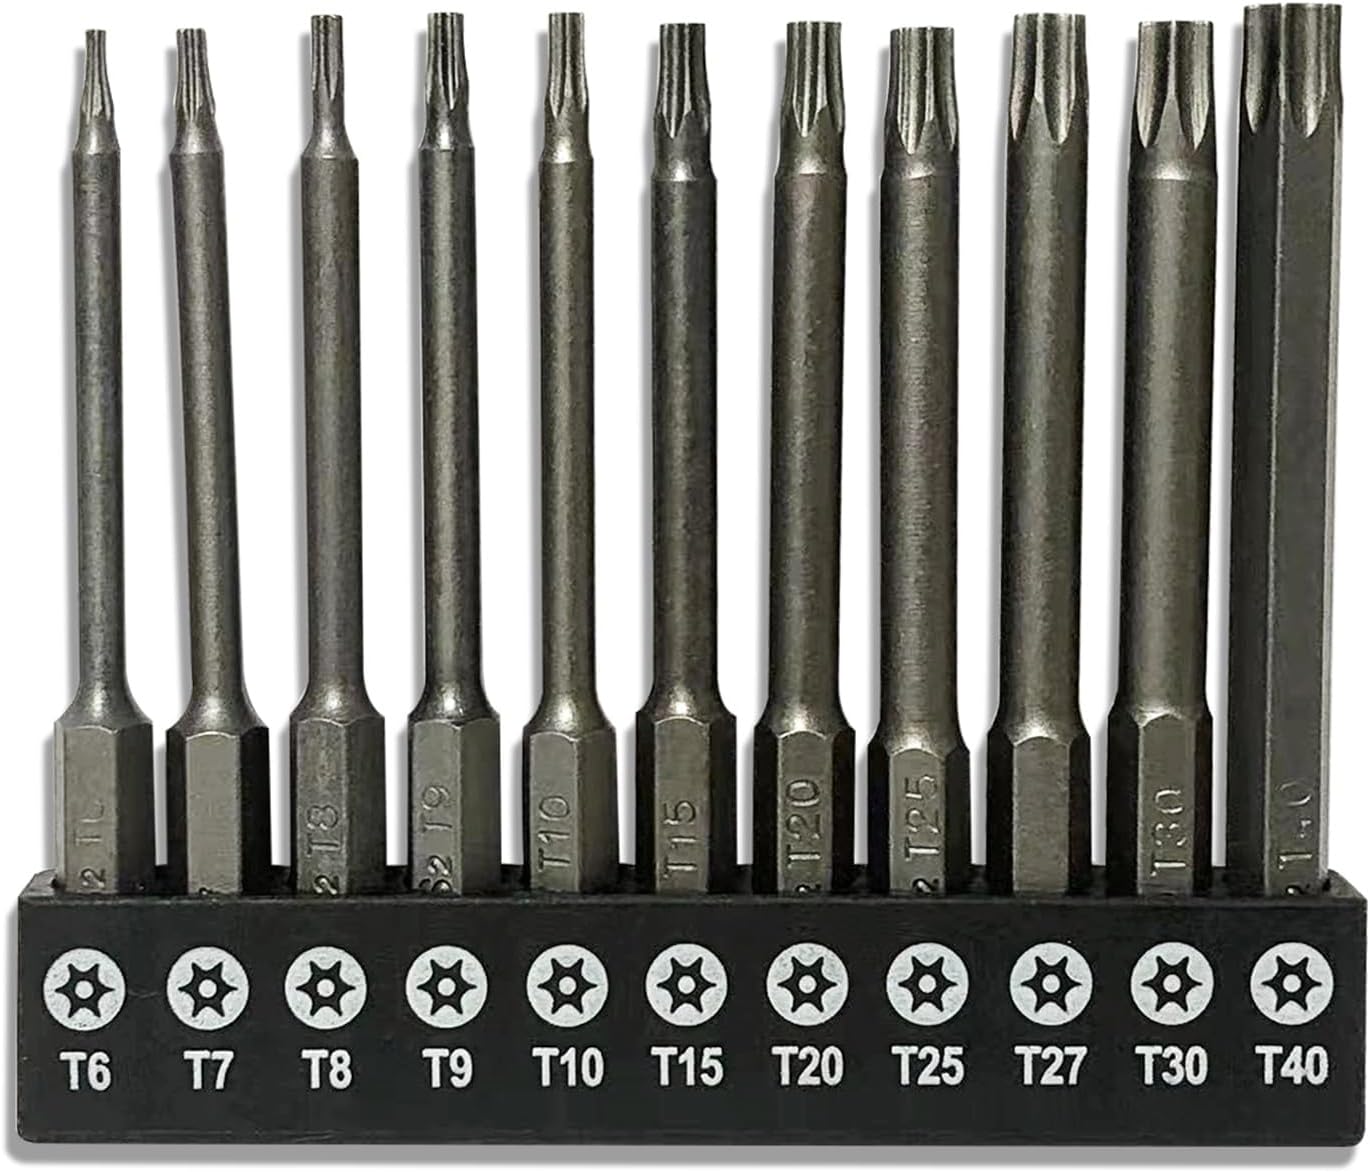
This set includes long magnetic security Torx bits covering T6 through T40. The 3-inch length can help reach recessed tamper-resistant screws found on many vacuum housings.
- Eleven security Torx sizes
- Long 75mm bit length
- Magnetic S2 steel bits
- Useful for other appliance and electronics repairs
- A handle or compatible 1/4-inch driver is still needed
- The exact screw size varies by Shark model
- Power tools can strip plastic housings if overtightened
- This tool set does not confirm sensor compatibility
Shark’s internal layout varies by model. Use the official owner guide and model-specific repair information whenever available. The steps below are a safe general framework, not a substitute for the exact service procedure.
- Power down and remove the robot from the dock. Take out the dustbin and detachable brushes that block the bottom cover.
- Photograph the underside. Record screw positions, brush locations, and wheel orientation.
- Remove the correct security screws. Use a properly fitting bit and keep different screw lengths separated.
- Lift the bottom cover slowly. Do not pull it away quickly because wires or clips may remain attached.
- Disconnect the battery when safely accessible. Follow the model-specific procedure and pull connectors by the plug body, not the wires.
- Locate the cliff sensor assembly. Compare the replacement against the original before disconnecting anything.
- Photograph the connector and cable path. This helps prevent reversed routing or pinched wires.
- Remove the old sensor. Release the connector latch and remove only the screws or clips holding that module.
- Install the replacement in the same position. Match the angle, height, screw tabs, and wire path.
- Reconnect and inspect. Make sure plugs are fully seated and cables remain clear of wheels, brushes, and cover edges.
- Reassemble without overtightening. The bottom cover should sit flat with no bulges or gaps.
- Clean all sensor windows. Use a dry microfiber cloth before the first startup.
Do not place the robot at the top of a real staircase for the first test. Start on a flat, open, light-colored floor with the robot physically supervised.
- Confirm normal startup. Watch for error lights, unusual sounds, or immediate shutdown.
- Check basic movement. Verify forward movement, turning, wheel travel, and brush operation.
- Run a short cleaning session. Keep the robot in reach and away from drops.
- Review the app. Look for repeated cliff errors or new navigation warnings.
- Test surface transitions. Move from light hard floor to a normal rug while supervising.
- Check docking. Confirm that the robot can approach and seat on the dock normally.
- Test edge detection conservatively. Use a manufacturer-recommended test method or a controlled low-risk barrier—not an unprotected staircase.
| Post-repair result | What it may mean | Next step |
|---|---|---|
| Error is gone on every normal floor | Repair may be successful | Continue supervised tests before unattended cleaning. |
| Same error appears immediately | Loose plug, wrong part, wrong orientation, another sensor, or board fault | Power down and recheck compatibility and installation. |
| Works on hard floor but not black rug | Environmental false detection | Use a no-go zone or physical barrier rather than reopening repeatedly. |
| Cannot dock after repair | Cover misalignment, cable interference, wheel problem, or remaining sensor issue | Inspect cover seating and cable routing. |
| Charging or power problems begin | Battery or connector was disturbed | Stop using the robot and inspect safely or seek service. |
| Problem | Likely cause | Fix |
|---|---|---|
| Robot still says cliff sensor error | Connector not fully seated, incompatible part, or another sensor fault | Recheck every connector and compare part numbers and board shape. |
| Robot refuses to move | Sensor orientation, blocked lens, loose bottom cover, or safety lockout | Power down and inspect alignment and cover fit. |
| New false alerts on one side | One board sits at a different height or angle | Check screw tabs, spacers, and lens seating. |
| Rattle after reassembly | Loose screw, unsecured cable, or cover clip | Stop operation and inspect before the loose part causes damage. |
| Wheel rubs or sticks | Cable routed into the wheel path | Reopen and restore the original cable channel. |
| Robot gets hot or smells unusual | Pinched wiring, short, battery damage, or poor connector | Disconnect power and seek professional service. |
- Wipe all cliff sensor windows with a dry cloth during routine brush and wheel maintenance.
- Remove hair from caster and drive wheels so the robot sits level.
- Keep the bottom cover secure and replace missing screws.
- Do not spray cleaner directly onto the underside.
- Store the robot indoors away from damp garages and extreme heat.
- Keep very dark rugs or runners away from open stairs when the model is sensitive to them.
- Install official app and firmware updates for the exact model.
- Monitor docking, runtime, charging behavior, and new noises after any repair.
A cliff sensor replacement is usually reasonable when the robot is otherwise healthy, the exact part match is confirmed, the battery and dock work normally, and cleaning or environmental checks did not solve the error.
Professional service becomes the better option when multiple sensors fail, the robot has charging or battery problems, the main board may be involved, the unit remains under warranty, or you cannot identify the correct internal revision.
Replacing the entire robot may make more financial sense when the vacuum also has a weak battery, unreliable dock, damaged wheels, worn brush motor, and limited parts support. Repeated small repairs can exceed the value of an older robot.
How do I know if my Shark cliff sensor needs replacement?
Repeated cliff errors on normal light-colored floors after cleaning, restarting, checking the cover, and ruling out dark rugs can point to a sensor or connection problem.
Are Shark robot vacuum cliff sensors universal?
No. Similar Shark robots can use different boards, connectors, cable lengths, screw tabs, and internal revisions. Match the exact model and physical part.
Which models fit the Goodsby sensor set?
The compatibility information lists selected Shark IQ models including RV1001AE, RV912S, RV913S, RV1000S, AV1002AE, AV1010AE, AV911S, UR1005AE, RV1101ARUS, and related listed models. Recheck the current Amazon listing before ordering.
Why does my Shark robot stop on a black rug?
Very dark surfaces can absorb infrared light and look like a drop to the cliff sensor. This can happen even when the sensor is working normally.
Should I cover the cliff sensors to cross dark carpets?
Covering a safety sensor can prevent the robot from detecting a real drop. Use no-go zones, barriers, or supervised cleaning instead.
Can I replace a Shark cliff sensor myself?
It may be possible on compatible models if you have the correct part, tools, and model-specific guidance. Stop if you encounter battery damage, burned wiring, or uncertain connectors.
What screwdriver do I need for a Shark robot vacuum?
The screw type varies by model. Many Shark housings use recessed security Torx screws, so a long T6-to-T40 security bit set is useful.
Why does the cliff error remain after replacement?
The replacement may be incompatible, misaligned, loosely connected, or installed with a pinched cable. Another sensor, wiring fault, or main-board problem may also be responsible.
How should I test the robot after repair?
Start on a flat, light-colored floor while supervising. Check normal movement, app errors, surface transitions, and docking before any controlled edge test.
When should I stop and call a repair professional?
Stop when you see a swollen battery, burned or pinched wiring, corrosion, strong odors, abnormal heat, charging failure, or unsafe movement near edges.
The sensor set is the right purchase only when the exact Shark IQ model and internal part match. Clean first, compare carefully, and test safely after installation.