Water Pipe Camera Position Guide for Accurate Inspections
Keep the camera centered in the pipe, aligned with the pipe’s axis, and move it slowly for the clearest inspection results. That positioning makes defects easier to spot and helps you record more reliable location notes.
For accurate plumbing diagnostics, the best water pipe camera position is centered in the pipe, aligned with the pipe’s axis, and moved slowly enough to keep cracks, roots, buildup, and blockages in view. That positioning gives you cleaner footage, more reliable depth estimates, and fewer false reads from glare or wall contact.
- Center the lens: A centered camera gives the most readable view of pipe walls and defects.
- Move slowly: Short, controlled advances reduce blur and missed problem spots.
- Check specs first: Head size, cable length, lighting, and wet-environment protection matter most.
- Avoid common errors: Wall contact, glare, cable memory, and reflections can distort the image.
- Know the limit: Use the camera for diagnosis, but call a plumber for structural or repeated issues.
What Is the Best Water Pipe Camera Position for Accurate Inspections?
Good inspection footage starts with the lens staying as close to the middle of the pipe as possible. When the camera rides too low, presses against the wall, or tilts sharply, the image can hide defects on one side and exaggerate debris on the other.
Direct answer: the camera should stay centered in the pipe, aligned with the pipe axis, and moved slowly to keep defects in frame
In practical terms, that means advancing the camera in small increments, pausing when something looks suspicious, and rotating only as much as needed to read the pipe surface. If your model has distance markings, use them to note where a defect appears so you can find it again later.
Why position matters for crack detection, blockage mapping, and pipe condition reports
Camera position affects more than image quality. It changes how easily you can spot hairline cracks, measure the length of a blockage, and describe whether a pipe issue is isolated or spread across a section.
When the lens is centered, shadows and reflections are easier to interpret, especially in wet or partially filled lines. That makes reports more consistent for homeowners, property managers, and plumbers who may review the footage later.
How Water Pipe Cameras Work in Smart Home Inspection Setups
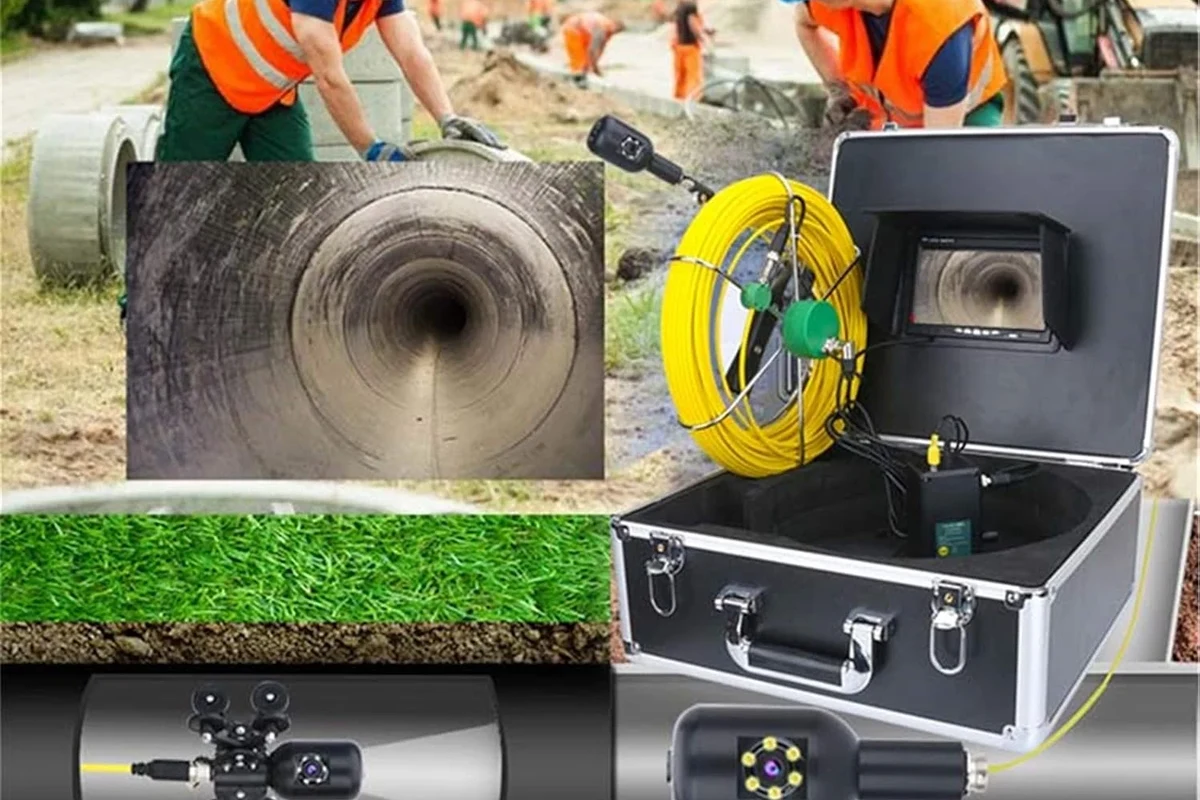
Water pipe cameras are usually used as part of a simple inspection system: a small camera head on a flexible cable, a light source, and a display or phone app. The exact features vary by model, but the basic goal is the same—get a clear view inside a pipe without opening the wall or digging unnecessarily.
Core components: camera head, cable, light source, monitor or app, and distance markers
The camera head captures the image, the cable pushes it through the line, and the light source helps reveal the pipe interior. Many systems include a built-in monitor, while others rely on a wired or wireless app connection. Distance markers on the cable can help estimate how far the camera has traveled.
- Camera head and attached cable
- Display, app connection method, or receiver
- Lighting controls, guides, and any included centering accessories
- Manual, charging cable, and waterproof accessory notes
How image angle, lighting, and cable control affect what you can actually see
A camera can only show what the lens points at, so angle matters a lot. If the head is angled toward one wall, the opposite side may disappear into shadow, while bright lights can make wet surfaces look like damage.
Reflections from standing water can make a smooth pipe surface look rough, which is why slow movement and careful repositioning matter so much.
Typical use cases in home plumbing, drain checks, and pre-repair diagnostics
These cameras are commonly used for sink drains, shower lines, appliance drains, and other accessible plumbing runs in the home. They are also useful before a repair, because they can help confirm whether the issue is a clog, corrosion, misalignment, or something that needs professional attention.
If your problem involves moisture near an iPhone or another device instead of a pipe, our guide on how to get water out of an iPhone charging port covers safer next steps for electronics.
Key Specifications to Check Before You Buy or Use One
For this kind of tool, the best model is not always the one with the most features. It is the one that matches your pipe size, inspection depth, lighting needs, and the way you want to view or save footage.
Camera head size, cable length, and flexibility for different pipe diameters
A smaller head usually fits tighter lines more easily, while a larger head may offer a better image in wider pipes. Cable length should match the longest run you expect to inspect, and flexibility matters because a stiff cable can struggle around bends or vertical sections.
Resolution, field of view, and low-light performance for clearer positioning
Resolution helps you read fine details, but it works best when paired with a usable field of view and decent low-light performance. A very wide view can make positioning easier, while a narrower view may help with detail but can make centering more important.
IP rating, cable durability, and whether the system is built for wet environments
Because the camera will be used around water, check the manufacturer’s IP rating and wet-environment guidance before use. Also look at cable jacket quality, connector protection, and whether the system is meant for intermittent splash exposure or continuous wet inspection.
Do not assume every camera is safe for every wet environment. Follow the manufacturer’s instructions for water exposure, and stop using the device if the cable, seal, or connector shows damage.
Display type, app support, Wi-Fi or wired connection, and storage options
Some users prefer a built-in screen because it is simple and quick to set up. Others want an app for saving clips, sharing findings, or reviewing footage later. Before buying, confirm whether the connection is wired or wireless, whether the app supports your phone or tablet, and whether storage is on-device, on a memory card, or in the app.
How to Position the Camera Correctly Inside Different Pipe Types
Different pipe layouts need slightly different handling, but the same core rule applies: keep the lens centered and move in a controlled way. The more stable the camera position, the easier it is to understand what the pipe is actually doing.
Centering the lens in narrow lines, elbows, and vertical sections
In narrow lines, let the cable advance gently instead of forcing the head through. In elbows, slow down and let the camera settle before moving again. In vertical sections, cable control becomes even more important because gravity can pull the head off-center or make it drop through a section too quickly.
- Use short pushes instead of long, fast advances.
- Pause after every bend so the image can stabilize.
- If available, use a centering guide or skid to keep the lens off the wall.
Managing camera tilt and rotation to keep the inspection path readable
Rotation is helpful when you need to inspect the full pipe wall, but too much spinning can make it hard to track where you are. A slight tilt is usually fine, as long as you can still tell top, bottom, and side features apart in the footage.
If you are documenting a defect, try to keep the camera orientation consistent for a few seconds so the issue is easier to compare later. That consistency matters when you are trying to explain a problem to a plumber or property manager.
Adjusting movement speed to avoid blur, missed defects, and false readings
Fast movement is one of the biggest reasons inspection footage becomes hard to use. It can blur small cracks, skip over buildup, and make it difficult to tell whether a dark mark is debris, staining, or actual damage.
Move the camera in short, controlled pushes so the image stays readable.
Stop when you see a crack, gap, root intrusion, or blockage.
Adjust the lens position before deciding whether the feature is real damage or a reflection.
Using reference marks or measurement tools to estimate depth and location
Distance markers, cable markings, or app-based measurement tools can help you estimate where a problem sits in the line. That is especially useful when you need to return to the same spot later or describe the issue during a repair estimate.
Keep in mind that measurements are approximate unless the system’s manual explains a more precise method. Cable slack, bends, and manual pushing can all affect the reading.
Common Mistakes That Reduce Inspection Accuracy
Most bad inspection results come from positioning errors rather than from the camera itself. If the footage looks confusing, the fix is often to slow down, re-center, and improve the lighting angle.
Letting the camera touch the pipe wall or sit too low in the flow line
When the head rides against the wall, it can miss the opposite side of the pipe and create misleading shadows. If it sits too low, debris and water can cover the view, making the line look worse—or better—than it really is.
Moving too fast, overexposing the image, or using poor lighting angles
Too much brightness can wash out details in reflective, wet pipes. Too little light can hide cracks and buildup. The goal is balanced lighting that reveals texture without flattening the image.
Ignoring cable memory, bends, and snag points that distort positioning
Cable memory can make the line curl or push the head off-axis, especially after storage. Snag points and tight bends can also make the camera seem centered when it is actually leaning against one side of the pipe.
Misreading condensation, debris, or reflections as pipe damage
Condensation can look like seepage, and mineral buildup can look like a crack from the wrong angle. Debris can also create irregular shapes that disappear once the camera is re-centered and the light is adjusted.
Safety, Setup, and Maintenance Best Practices
Safe setup matters because water, power, and electronics do not mix well. Before any inspection, check the device condition, the power source, and the environment where you plan to work.
Power and cable safety: inspect connectors, rated wattage if applicable, and damaged insulation before use
If your system uses external power or charging, inspect the cable, connectors, and insulation first. Use only the adapter or charger the manufacturer recommends, and stop using the device if you see fraying, exposed conductors, or heat damage.
Stop using damaged electronics, swollen batteries, frayed cables, overheating chargers, or unstable appliances and follow the manufacturer’s guidance.
Setup checks: app permissions, battery charge, cable condition, and waterproof seals
Before starting, confirm that the app has the permissions it needs, the battery is charged, and the cable is free of kinks or cuts. If the model includes seals or caps, make sure they are seated correctly before the camera enters a wet area.
For app-connected models, it is also smart to verify firmware or app updates from the official source when the manufacturer recommends them. Features and stability can vary by model, region, and software version.
Safe use around water, chemicals, and electrical fixtures in the home
Avoid using the camera in areas where live electrical parts, damaged outlets, or exposed wiring are present unless the manufacturer explicitly says the device is suitable. If the pipe may contain cleaning chemicals or unknown residues, use gloves and follow the product safety guidance for that space.
If moisture is near outlets, chargers, or other electronics, deal with the electrical hazard first before inspecting the pipe.
Cleaning the camera head, drying the cable, storage tips, and replacement guidance for worn parts
After use, wipe the camera head clean, dry the cable fully, and store everything loosely to reduce cable memory. Replace worn parts such as cracked lens covers, damaged seals, or stiff cables according to the manufacturer’s parts guidance.
If the system includes a battery, follow the official charging and storage instructions rather than leaving it plugged in indefinitely. That helps preserve reliability and reduces the chance of heat-related wear.
Who This Guide Fits and When a Water Pipe Camera Is Worth It
This tool is most useful when you need better information before spending money on a repair. It gives everyday users a way to see inside a pipe without guessing, but it is not a substitute for every plumbing diagnosis.
Best for homeowners, DIY troubleshooters, property managers, and smart home users
Homeowners can use it to understand recurring clogs or suspicious leaks. Property managers may use it to document issues across units. DIY troubleshooters and smart home users often value it because it helps them decide whether a problem is minor, recurring, or beyond a basic fix.
When a camera inspection is enough versus when to call a licensed plumber
A camera inspection is often enough for confirming a clog, checking a drain run, or deciding whether a repair estimate makes sense. Call a licensed plumber if you see structural damage, repeated backups, significant corrosion, or anything that seems unsafe to clear yourself.
For more general home-device moisture issues, the safest next step is often to follow the official manual first and then escalate only if the problem remains. That approach is especially important when electronics and water are both involved.
Value factors: time saved, avoided tear-out, and better repair decisions
The main value of a pipe camera is not just convenience. It can save time, reduce unnecessary tear-out, and help you make a better decision about whether to repair, replace, or call in help.
That value is highest when the camera footage is clear enough to show location and condition, which brings the focus back to positioning. Good placement is what turns a basic camera into a useful diagnostic tool.
Final Recommendation: How to Get the Most Reliable Results in 2026
For the most reliable inspection results, use a model that fits your pipe size, supports stable lighting, and gives you a clear way to view or save footage. Then keep the lens centered, move in short increments, and re-check suspicious spots from a steadier angle before you decide what the image means.
Recommended positioning workflow for cleaner footage and more accurate diagnostics
Start by centering the head, advancing slowly, and pausing at every change in texture, color, or shape. Use distance markers or app notes to record where each issue appears, and reorient the camera only enough to confirm what you are seeing.
Ideal feature set to prioritize for most smart home buyers
Most buyers should prioritize a camera head that fits the pipe, useful low-light performance, dependable wet-environment protection, and a display or app that is easy to review later. Storage and connectivity matter too, but only if they are compatible with your phone, tablet, or workflow.
Limits of camera inspections and the situations where they are not enough
A pipe camera cannot replace professional judgment when the problem involves hidden structural damage, hazardous water exposure, or repeated failures that point to a larger plumbing issue. It is a strong diagnostic aid, but not a cure-all, and the best results come from pairing careful positioning with realistic expectations.
Frequently Asked Questions
Keep the camera centered in the pipe, aligned with the pipe axis, and move it slowly. That position makes cracks, buildup, and blockages easier to see.
Position affects what the lens can see, how lighting behaves, and how easy it is to estimate location. Poor positioning can hide defects or create false reads from glare and shadow.
Focus on head size, cable length, flexibility, low-light performance, wet-environment protection, and the display or app connection. The best choice depends on your pipe size and how you plan to review footage.
Use short pushes, pause after bends, and let the head settle before moving again. A centering guide or skid can also help keep the lens off the pipe wall.
Common problems include moving too fast, letting the camera touch the wall, using too much light, and misreading reflections or debris as damage. Cable memory and snag points can also distort the camera’s position.
Call a licensed plumber if you see structural damage, repeated backups, corrosion, or anything unsafe to clear yourself. A camera is useful for diagnosis, but it cannot solve every plumbing problem.