Biggest Bucks on Trail Camera results come from repeat movement patterns, low-pressure placement, fast trigger performance, dependable night capture, and a setup that reduces unnecessary visits to the property.
Trail cameras help you find big bucks by revealing repeat movement patterns, not by proving a deer will be there every day. The best results come from low-pressure placement, careful setup, and using the camera data alongside sign and terrain.
A premium single-camera option for hunters who prioritize fast capture, useful image detail, cellular monitoring, and lower-pressure camera checks.
A two-camera cellular setup for monitoring a primary route and a nearby backup trail without relying on one camera location.
Biggest Bucks on Trail Camera is not about collecting one impressive image. The real goal is to learn when mature deer move, which routes they repeat, and how to gather reliable intel without creating extra pressure.
- Pattern over photo: One giant buck picture is useful, but repeated sightings and timestamps matter more.
- Placement wins: Funnels, bedding edges, and travel corridors usually outperform random tree setups.
- Spec priorities: Trigger speed, recovery time, and image clarity are more important than megapixels alone.
- Pressure matters: Too many camera checks can change mature deer behavior, especially on shared land.
- Verify before buying: Check app support, battery type, weather sealing, and subscription terms first.
Biggest Bucks on Trail Camera: What It Really Means and How to Use Trail Cam Intel
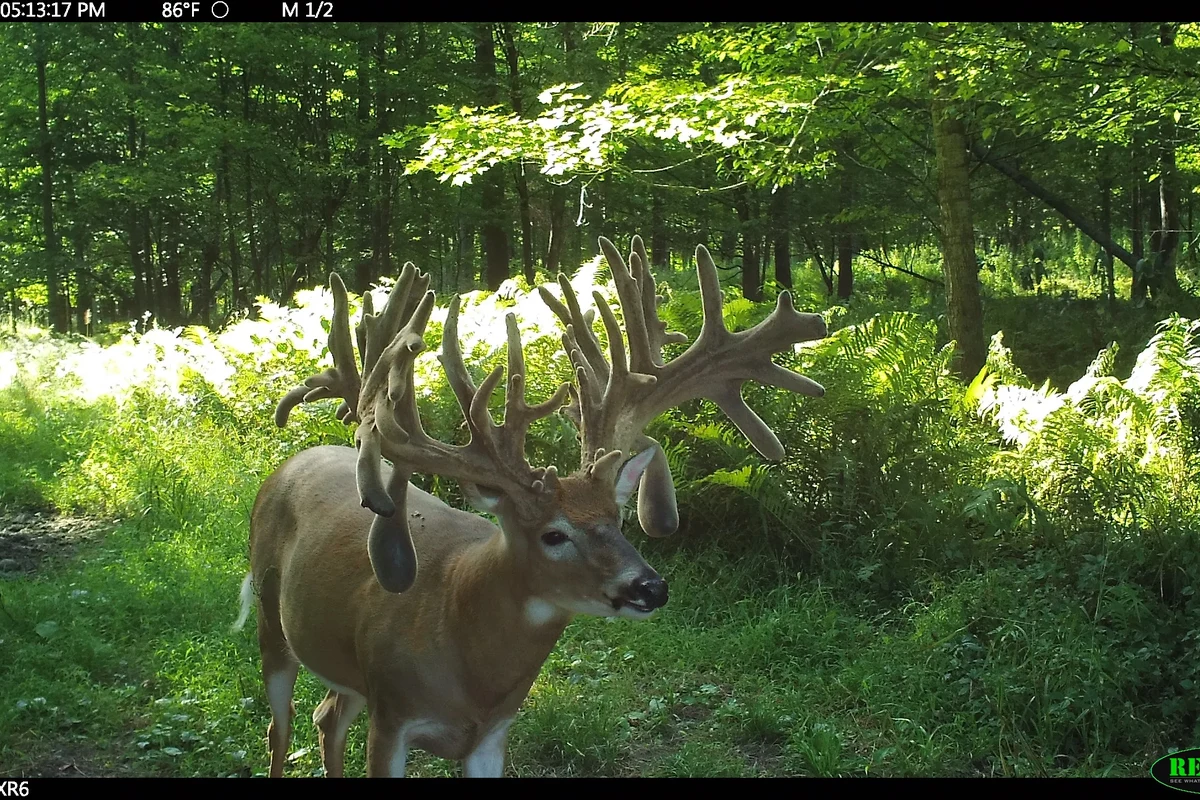
Seeing a big-antlered deer on camera is exciting, but the photo itself is only one clue. The real value comes from repeated sightings, time stamps, direction of travel, and how the buck behaves across different locations.
Quick answer: the best trail camera strategy for trophy deer
The best strategy is to place cameras on low-pressure travel routes, check them sparingly, and use the photos to confirm movement rather than chase every sighting. Mature bucks often shift patterns with hunting pressure, weather, and food changes, so the most useful camera intel is the kind that shows trends over time.
Why trail camera photos help identify mature buck patterns
Trail camera images can show body shape, antler growth, and the times a buck is active. Over multiple weeks, that information helps you tell whether a deer is using a bedding-to-food route, visiting a scrape line, or simply passing through once in a while.
How Trail Cameras Work for Trophy Deer Scouting
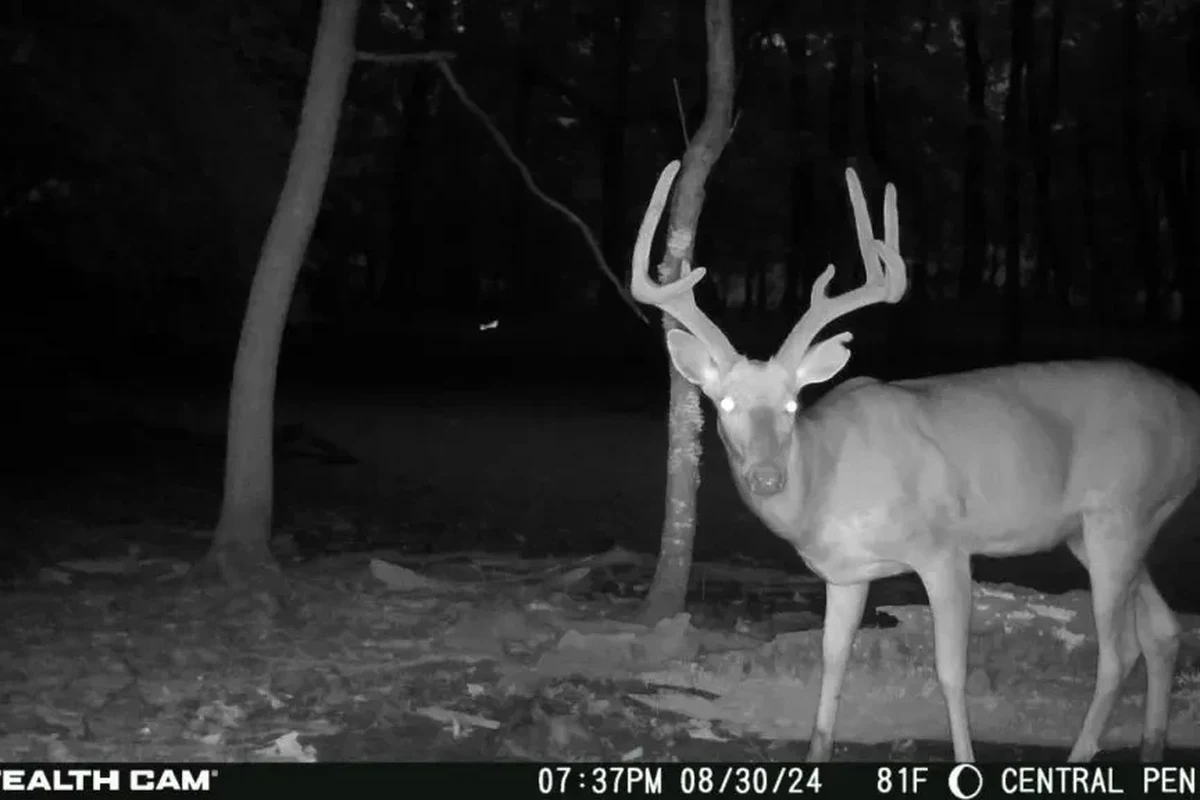
Trail cameras are motion-activated tools that capture still images or video when something moves in front of the sensor. For trophy scouting, the value is in the data trail: the camera location, timestamp, and repeat appearances matter as much as the image quality.
Motion sensors, infrared flash, and timestamp data
Most trail cameras use a passive infrared sensor to detect heat and movement. When triggered, the camera takes a photo or video, often with an infrared flash that is less visible than a standard white flash, which can help reduce disturbance in the woods.
Trail cameras are most useful when the timestamp and location are treated like scouting notes, not just picture metadata.
Timestamp data can help you identify whether a buck is moving before sunrise, after dark, or during short windows tied to weather or food availability. That makes the camera more like a scouting log than a simple photo device.
Cellular vs. non-cellular trail cameras for buck monitoring
Cellular cameras send photos to an app or web portal, which means you can monitor activity without visiting the site as often. That can reduce human scent and pressure, but it also depends on cell coverage, carrier support, app reliability, and subscription terms that vary by model.
Non-cellular cameras typically use an SD card, which is simple and often cheaper to run. The trade-off is that you must physically check the camera, which can be fine for less sensitive areas or properties where access is already low-risk.
App features, cloud storage, notification timing, and subscription pricing vary by brand, firmware, and region. Always confirm the current app listing and plan details before buying.
What camera specs matter most in 2026: trigger speed, recovery time, and image clarity
For deer scouting, the most useful specs are usually trigger speed, recovery time, and image clarity in low light. A fast trigger can catch a buck before it exits the frame, while a short recovery time helps the camera capture multiple animals or follow-up movement.
Do not overfocus on megapixels alone. Real-world usefulness depends on lens quality, sensor performance, and how the camera handles low light and motion blur.

This is the strongest premium single-camera recommendation for a high-priority buck route where trigger performance, night capture, cellular convenience, and fewer in-person checks matter.
- Scrape lines, bedding-edge routes, funnels, and mature buck travel corridors
- Hunters who want to reduce unnecessary SD-card checks
- One critical camera position where missed captures matter most
- Current cellular carrier support, app requirements, subscription terms, and coverage
- Battery type, SD-card requirements, weather sealing, and included accessories
- Exact trigger, recovery, flash, image, and video specifications on the current listing
Who This Guide Fits: Hunters, Landowners, and Public-Land Scouters
Trail cameras can help many kinds of deer hunters, but the best setup depends on property access, pressure, and how much you can check the camera without disturbing the area. A good camera strategy on private land may be a poor fit on heavily pressured public ground.
Best use cases for private land management
Private landowners can use cameras to monitor food plots, field edges, creek crossings, and entry trails near bedding cover. That makes it easier to see how deer respond to habitat changes, seasonal food sources, and hunting pressure.
Private landowners who can keep camera checks low and use the data to shape stand placement, food timing, and access routes.
What changes when you hunt pressured deer or shared properties
On pressured land, deer often become more nocturnal and more sensitive to human scent, noise, and repeated camera visits. In those settings, camera placement and retrieval discipline matter more than fancy specs, because a great camera can still ruin a good spot if it is checked too often.
- Use longer intervals between checks when deer pressure is high.
- Place cameras where you can approach quietly and avoid walking through bedding cover.
- Favor simple, reliable settings over constant mode changes.
When trail camera intel is not enough on its own
Camera photos cannot tell you everything. A buck may appear regularly on camera and still change routes after a wind shift, acorn drop, or hunting intrusion, so you still need tracks, rubs, scrapes, wind direction, and terrain context.
Key Buying Criteria for Capturing the Biggest Bucks
If your goal is to document mature deer, the best camera is the one that balances detection, discretion, durability, and ease of use. The right choice depends on whether you want maximum convenience, minimum disturbance, or the lowest long-term cost.
Detection range, flash type, and low-glow vs. no-glow trade-offs
Detection range affects how early the camera notices movement, while flash type affects how visible the camera is to deer and people. Low-glow cameras usually emit a faint red light at night, while no-glow models are harder to notice but may sometimes trade off a bit of illumination or image brightness depending on the model.
- Longer detection range can improve capture odds on fast-moving trails
- No-glow options may reduce spooking in sensitive areas
- Long-range detection can still miss side-angle movement if placement is poor
- Some invisible-flash models may produce less nighttime detail than expected
Battery life, power options, and safe use limits for rechargeable packs
Battery life depends heavily on trigger frequency, temperature, video use, cellular transmission, and app settings. Rechargeable packs can be convenient, but they should be used only as the manufacturer allows, with the correct voltage, connector type, and charging method.
Use only approved batteries, chargers, and power accessories for your camera. Stop using damaged battery packs, swollen cells, frayed cables, or any setup that overheats, leaks, or shows corrosion.
If you want broader charging guidance for portable gear, it is worth understanding how battery settings and power modes affect runtime in other devices too, such as in this guide on whether low power mode changes charging behavior.
Durability, weather sealing, and storage capacity
Outdoor cameras should be built for rain, humidity, heat, and cold, but weather resistance still varies by model. Confirm the enclosure design, latch quality, gasket fit, and memory card support before relying on a camera in year-round conditions.
- Check detection range, flash type, and recovery time
- Confirm battery type, SD card support, and weather sealing
- Review warranty terms, app support, and current firmware updates
App quality, connectivity, and subscription costs for smart cameras
For cellular cameras, the app is part of the product. A clean app with reliable alerts, easy image sorting, and stable syncing is often more valuable than extra marketing features that sound good but are rarely used in the field.
Before buying, check whether the camera works on your carrier or network, whether the app requires an account, and whether core features are locked behind a subscription. If you are comparing connected devices in general, it helps to think about how app and network reliability affect other smart gadgets too, such as wireless charging compatibility across different phones.
How to Set Up a Trail Camera for Trophy Buck Success
Good setup matters more than almost any spec sheet detail. A well-placed average camera often beats a premium camera aimed at the wrong trail, wrong height, or wrong angle.
Best mounting height, angle, and field-of-view placement
Mount the camera so it covers the travel lane without pointing into direct sunrise or sunset glare when possible. The camera should be stable, level, and aimed to catch deer broadside rather than only from behind or at the edge of the frame.
Choose a spot that keeps the camera from wobbling in wind and avoids obvious human disturbance.
Place it so deer cross the field of view instead of walking straight at or away from the lens.
Clear small obstructions carefully, but avoid overcutting cover that deer use for security.
Choosing funnels, bedding edges, scrapes, and travel corridors
The best places for buck cameras are usually terrain features that naturally concentrate movement. Think pinch points, creek crossings, fence gaps, saddle routes, bedding edges, and scrape lines that sit between cover and food.
On private land, it is often smart to place one camera on a known travel corridor and another on a backup route nearby. That gives you a better chance of seeing whether a mature buck is using one path consistently or shifting with pressure.

This twin-camera starter pack is the natural high-ticket choice for hunters who want to compare a main buck route with a nearby backup trail while reducing field disturbance.
- One camera on a primary corridor and one on a secondary path
- Funnels, scrape lines, bedding edges, field approaches, and creek crossings
- Hunters who want broader coverage without buying each camera separately
- Carrier compatibility, current app features, subscription costs, and local signal
- Included SD cards, batteries, mounts, straps, and exact starter-pack contents
- Current flash type, detection range, trigger speed, and video-upload behavior
Card format, app setup, and initial test shots
Format the memory card in the camera before deployment if the manual recommends it, and make sure the card capacity is supported by the model. For cellular units, confirm the app pairing, signal strength, notification settings, and photo upload behavior before leaving the site.
Take a few test shots after mounting, then review them for focus, angle, and detection coverage. This simple step can reveal whether the camera is aimed too high, too low, or too far off the travel line.
Common setup mistakes that spook mature deer
The biggest mistakes are checking cameras too often, placing them at eye level, overtrimming cover, and using scent-heavy routines around bedding areas. Mature bucks notice repeated human traffic, especially if the camera is in a location they already use cautiously.
Stop using a camera if the housing is cracked, the latch is broken, moisture is inside the unit, or the battery compartment shows corrosion. Follow the manufacturer’s guidance before redeploying it.
Real-World Benefits and Limits of Trail Camera Buck Hunting
Trail camera intel can improve timing, confidence, and location choices, but it does not guarantee a harvest. The best hunters use the data to reduce uncertainty, not to assume a buck will behave the same way every day.
What trail camera evidence can reveal about movement, timing, and antler growth
Repeated photos can show whether a buck is a regular visitor, a nighttime traveler, or a seasonal mover. They can also help you track antler progression, body condition, and whether a deer appears to be using a core area or just passing through.
Limitations: nocturnal movement, false assumptions, and weather effects
A lot of mature bucks appear mainly at night, especially in pressured areas. Weather, barometric shifts, moonlight, crop harvest, and hunting pressure can all change movement patterns, so a camera pattern from one week may not hold the next.
It is also easy to misread a single event as a trend. One daytime photo of a giant buck can be useful, but it does not prove the deer will repeat that movement under the same conditions.
Evidence quality: why one photo rarely tells the full story
Good scouting comes from clusters of evidence, not isolated images. Look for repeated time windows, repeated directions of travel, and matching sign on the ground before you make a stand plan.
If your camera is part of a larger smart-home or connected-device routine, the same principle applies: reliable automation depends on consistent inputs, not one-off events. For example, device behavior can vary by app, power setting, or connection quality, which is why it is smart to verify settings rather than assume a default will work forever.
Maintenance, Safety, and Long-Term Care for Trail Cameras
Trail cameras last longer and perform better when they are kept clean, dry, and powered correctly. Regular maintenance also reduces false triggers, missed photos, and corrupted files.
Battery inspection, replacement timing, and storage care between seasons
Check batteries before each deployment and replace them before they are fully drained if your camera becomes unreliable at low power. When storing the camera off-season, remove batteries if the manual recommends it and keep the unit in a cool, dry place.
Lens cleaning, housing checks, and moisture protection
Clean the lens gently with a soft, lint-free cloth and inspect the seals, latch, and card door for wear. If your area is humid or sees heavy rain, moisture control matters because condensation can blur images and damage electronics over time.
For hunters who travel with gear, it can also help to understand general electronics care and transport rules, including the basics covered in this article on traveling with laptop chargers.
Safe use in the field: straps, locks, theft prevention, and minimizing disturbance
Use sturdy straps or mounts that match the camera’s design, and add a lock only if it does not interfere with safe access or the manufacturer’s setup instructions. Keep disturbance low by limiting visits, avoiding unnecessary scent contamination, and approaching from the least disruptive route.
Final Verdict: Is Trail Camera Intel Worth It for Finding the Biggest Bucks?
Yes—if you use it as a scouting tool instead of a shortcut. Trail cameras are most valuable when they help you learn where a mature buck moves, how often it appears, and what patterns hold up long enough to matter.
Best value approach for most hunters in 2026
For most hunters, the best value is a dependable camera with solid image quality, reasonable battery life, and easy placement in a low-pressure location. That combination usually matters more than chasing the most advanced app or the highest marketing numbers.
When to choose a budget camera, a premium cellular model, or a hybrid setup
Choose a budget camera if you mainly want simple scouting on accessible property and do not mind card checks. Choose a premium cellular model if reducing site visits is the top priority and you have verified coverage plus ongoing subscription support. A hybrid setup works well when you want cellular convenience in key locations and cheaper non-cellular units in lower-priority spots.
Transparent recommendation based on goals, land type, and budget
If your goal is finding the biggest bucks on trail camera, start with the least intrusive setup that still gives you reliable data. Match the camera type to your land pressure, check the manual and app details before buying, and focus on patterns that repeat rather than one impressive photo that may never happen again.
Trail camera intel is worth it for trophy deer scouting when you use it to confirm patterns, reduce pressure, and choose better access points. The best setup is the one that fits your land, your budget, and how often you can check it without changing deer behavior.
Best when one high-priority buck route deserves the premium camera.
Check Browning →Best when comparing primary and backup travel paths is the bigger priority.
Check SPYPOINT →Frequently Asked Questions
What is the best trail camera strategy for finding trophy deer?
Use cameras on low-pressure travel routes and check them sparingly. Focus on repeat patterns, not just one big photo.
Do cellular trail cameras work better for big bucks?
They can reduce site visits, which helps in pressured areas. But they depend on coverage, app quality, and subscription terms.
What specs matter most for buck scouting?
Trigger speed, recovery time, image clarity, and flash type matter most. Megapixels alone are not a reliable measure of real-world performance.
Where should I place a trail camera for mature bucks?
Use funnels, bedding edges, scrapes, crossings, and travel corridors. The best spot is usually where deer naturally concentrate movement.
How often should I check a trail camera?
Check it as infrequently as you can, especially in pressured areas. Too many visits can change deer movement and reduce the value of the camera.
What should I verify before buying a trail camera?
Confirm battery type, SD card support, weather sealing, app requirements, and warranty terms. For cellular models, also verify coverage and any subscription costs.